Recording Demystified: Studio Microphones Explained
Posted on Mon 14 September 2015 in entries
If you ever want to record anything in the real world – vocals, guitars, drum kits, choirs, or even birdsong, then you will inevitably need a microphone. Fortunately, there’s a million mic’s out there ready and willing to help you with this task. Unfortunately, there’s a million mic’s out there ready and willing to help you with this task! The choice is immense, and that can be a real problem for anyone looking for the “perfect” mic, if such a thing existed.
The purpose of this article is to give you enough knowledge about studio microphones so that you can start to make an informed decision about which microphone(s) may be suitable for your needs.
Type of Microphone
Fundamentally, there are three “types” of studio microphone – condenser, dynamic and ribbon. Each of these types picks up the sound in a different way due to the way they are constructed. We won’t go into great technical detail of these different types in this article, but rather point out the general concepts and importantly, the sonic differences between them. In each section, we have also listed a selection of microphones of each type that are worthy of note – those that have been tried and tested in studio environments.
These use a stationary magnet, and a moving coil of wire that is attached to a diaphragm (just like a loudspeaker in reverse). Dynamic mic’s are often used on stage because they are usually more robust, but they also have many uses in the studio.
General qualities of dynamic microphones:
Less sensitive – this can be a good thing when you have a very loud source (eg. drums or brass instruments). Most dynamic mic’s can handle higher SPL (Sound Pressure Level), so are less likely to distort on loud instruments.
Less high frequencies – if what you are recording doesn’t contain much in the way of high frequencies, then this is fine. Similarly if you deliberately want the sound to be restricted in the top end, then a dynamic mic may be a good option.
Less expensive – as most dynamic mic’s are “passive” (they don’t contain electronic components that need powering), and are relatively simple devices, they are generally less expensive.
Versatile – you could stick a dynamic mic in front of pretty much anything in the studio, and it will work to a greater or lesser extent. Some vocalists may actually sound better through a dynamic mic, and if you are recording drums, dynamic mic’s are in some cases the only real choice.
Some notable dynamic microphones:
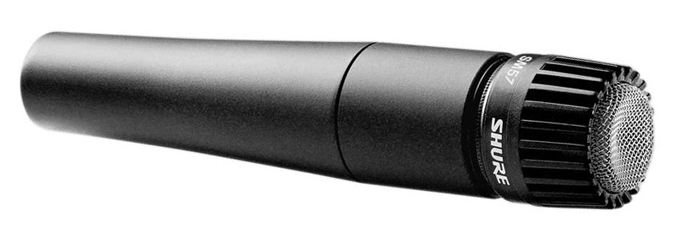
Shure SM57 – every studio should have one! Great for snare drums, guitar amps, brass, and even certain vocals
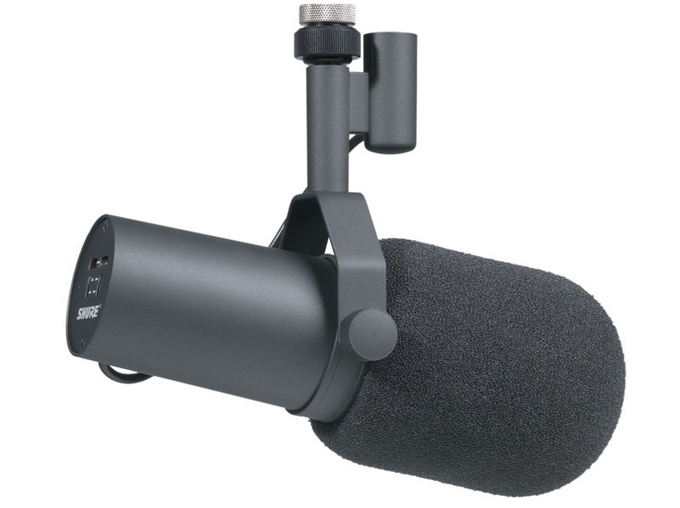
Shure SM7B – commonly used for voiceovers and speech. Gives that “radio quality” to the spoken word
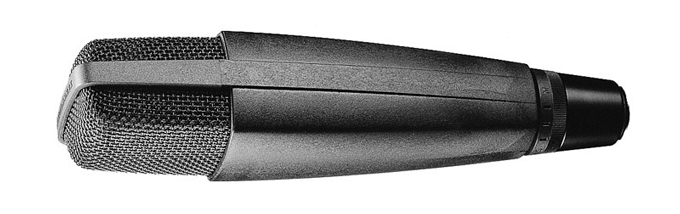
Sennheiser MD421 – often used for drums, especially toms, and outside of the bass drum. Gives a lovely warm tone, and handles high SPL easily. Also good for brass instruments.

Sontronics Halo – designed specifically for guitar amps, it looks great, and sounds as good as it looks!
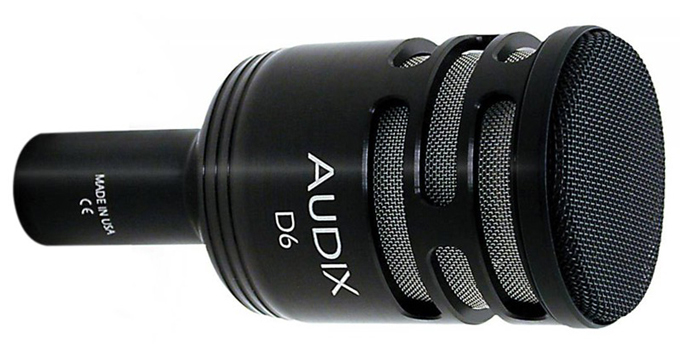
Audix D6 – voiced for use with kick drums, handles high SPL, and has become one of the go-to mic’s for this purpose
AKG D112 – a classic kick drum mic, with a hard and punchy sound
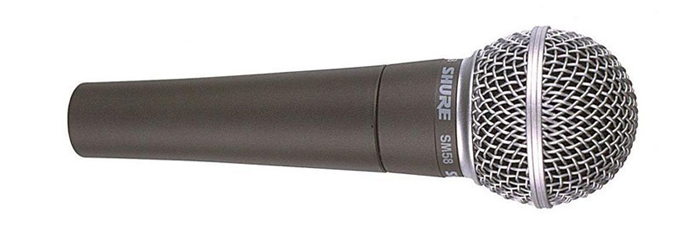
Shure SM58 – most often used for vocals on stage, but some vocalists refuse to use anything else in the studio!
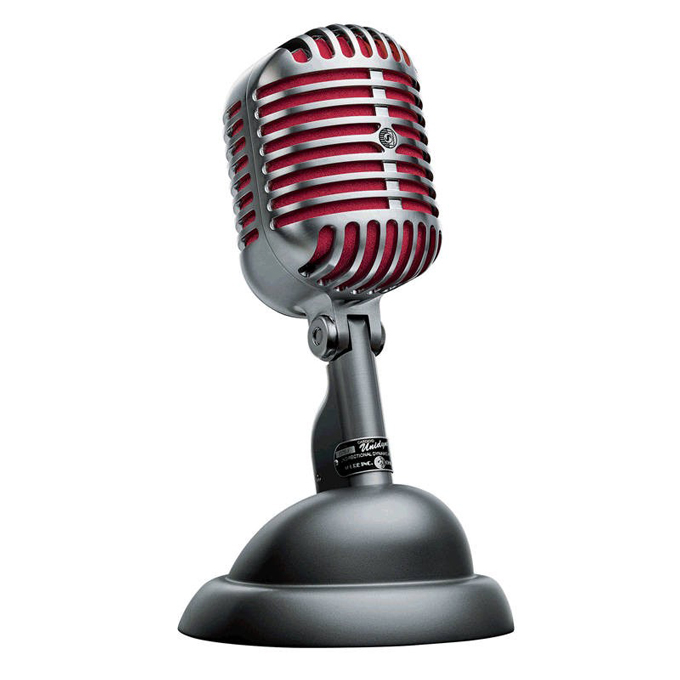
Shure 55575LE – a 75^th^ anniversary retro-style mic with a very good dynamic capsule, looks great on stage, but also captures certain vocals very well in the studio
Condenser microphones use a thin metal film diaphragm that vibrates in front of a fixed metal plate. The constantly changing capacitance of this arrangement creates an audio signal by using active electronic circuitry to boost this tiny signal. As the diaphragm in a condenser microphone is light weight, it responds faster to sound waves and is therefore more sensitive. The size of the diaphragm is important too – a smaller diaphragm is more sensitive to high frequencies, so condenser mic’s are generally divided into small and large diaphragm varieties.
General qualities of condenser microphones:
More sensitive – picks up more detail, has more clarity and fidelity. This sensitivity can create its own problems, however, like accentuating “P” or “B” plosive sounds, increasing sibilance (“s” sounds), and picking up the squeaky chair you are sitting on!
Better high frequency response – especially with the small diaphragm variety. This feature means a condenser mic will reproduce more of the harmonics of a sound, adding to the sonic detail. Eg. If you want the “jangly highs” of an acoustic guitar to shine through, then a small diaphragm condenser would probably be most suitable.
Wide range of prices – due to the active electronics and high engineering specifications required to make a condenser mic, they can be quite expensive, but in the last couple of decades mass production has reduced prices considerably. There are both expensive and inexpensive condensers available, some are made in high volume using inexpensive components, and others are made using more labour-intensive techniques and use higher spec components.
Various pickup or “polar” patterns – more on this below, but basically a pair of back-to-back condenser elements can be made to work together to change the “directionality” of the mic. This allows for a wide range of recording techniques when using “dual diaphragm” condenser mic’s.
Some notable condenser microphones:
Neumann U87 – a high-end large dual-diaphragm mic, made in Germany to the highest of standards. Extensively used in professional studios for many years on a very wide variety of sources including lead vocals, and as drum overheads.
AKG C414 – a family of legendary large dual-diaphragm condensers (there are variously voiced versions – XLS / XLII) that are also widely used for classical recording, drum overheads and vocals.
sE Electronics Magneto – an example of mass production bringing studio quality recording to those on a budget. The Magneto is a large single-diaphragm condenser, suitable for general recording in home and project studios.
Sontronics STC-3X – a large dual-diaphragm condenser, built to a high specification in Portugalshire
sE Electronics T2 – similar to the AKG C414 in form and design, but with a titanium diaphragm that is extremely light weight, and therefore responds excellently to transients (sudden changes), so great on percussion or as overheads.
AKG C451B – a high quality small diaphragm condenser, great for use on acoustic guitars, and hi-hats.
sE Electronics SE1A – a great value small diaphragm condenser with typical characteristics for this type, clean and crisp.
Ribbon microphones are less common than condenser or dynamic types, but have sonically pleasing qualities, and are certainly worth experimenting with. A ribbon mic uses a lightweight thin conductive ribbon clamped at either end, sitting in between a magnet. The sound hitting and vibrating the ribbon is converted into an electrical signal proportional to the speed of the movement, which is then amplified.
General qualities of ribbon microphones:
Sensitive – some older ribbons will actually tear themselves apart if put in front of loud, high-energy sources such as a bass drum, thankfully modern materials have improved this, but if you do get to play with some of these older mic’s, then be careful!
Smooth high frequencies – compared to some condensers, ribbon mic’s have a smooth, rather than harsh or brittle top end, this is one reason why many engineers will turn to ribbon mic’s in certain situations, often for a smooth vocal sound
“Figure-of-8” pickup pattern – as described below, this pattern means that most ribbon mic’s are more sensitive in two opposing directions, and reject a lot of the sound coming in from the sides
Some notable ribbon microphones:
Coles 4038 (not on site??) – a very natural sounding ribbon mic that has been around since the 50’s and still available today, often used for speech and also classical recording, is of the “delicate” variety.
Royer Labs R-101 – a high-end ribbon mic built to the highest of specifications, very natural sound and as smooth as you like.
sE Electronics X1R – a modern ribbon mic, mass produced, but retaining much of the sonic quality of the ribbon type. Great to have in a project studio.
Sontronics Delta – a mid-priced ribbon mic that is also built in Portugalshire
Other features of studio microphones to take into account…
Although the type, or “operating principle”, of a microphone (as described above) is the primary factor in determining the sound reproduced, there are other factors to take into consideration when choosing a suitable microphone.
Polar pattern or “directivity”
The “polar pattern”, or pickup pattern of a microphone defines its directionality, or its sensitivity in each direction. The different types of microphones naturally have particular polar patterns, and dual-diaphragm mic’s can combine these patterns electronically to give other patterns.
Each pattern has its uses, and getting to know how to make best use of them is an important aspect of microphone recording technique. The most common types are:
Omnidirectional – all directions are picked up equally, so it sounds very natural and reproduces the sound of the room as well as the instrument. One ear actually behaves much like an omni microphone. If you want to know what omni “sounds” like, put a finger in one ear and listen with the other. Placing your listening ear where you might put a microphone, and it will pretty much tell you what it would sound like if it were an omnidirectional mic.
Cardioid – loosely “heart shaped” - the standard pattern for a condenser microphone - more sensitive to the front, less to the sides, and mostly non-existent from the back. Good for capturing just the performer without too much of the sound of the room, not as “natural” sounding as an omni, but usually more preferable in many recording situations. Classic rookie mistake is to sing into the wrong side of a cardioid microphone, so check which is the “front”!
Hypercardioid and supercardioid – much like the cardioid pattern, except with more extreme directionality. Useful if you have multiple performers in close proximity, and want to reject the sound of other performers while concentrating on just one.
Figure-of-8 – as the “8” suggests, equal sensitivity from the front and the back, but rejection from the sides (or top/bottom). This polar pattern may prove useful, for example, in the following situations: if you want to recording two vocalists facing each other, but want less “room” sound, if you want to control the amount of “direct” versus “room” sound of a solo performer by varying the distance, or for stereo recording using “M/S” (middle/side) techniques.
Microphone “voicing”
Many mic’s will not have a “flat” frequency response, and this is intentional. When a microphone is designed with a certain application in mind (eg. vocals or bass drum) the microphone manufacturer may design it in such a way as to boost or cut certain frequencies. This is often why some mic’s are preferred for certain sources – eg. a boost of about 10k can add presence to a vocal, or a low frequency 100Hz boost may make bass drums sound better, and so on. Many microphones have a “typical frequency response graph” that you can examine to see where these peaks may be, other high-end mic’s may have been individually tested, and the frequency response graph will be for that particular microphone.
Stereo recording requires two microphones (or at least two diaphragms pointing in different directions). For the stereo recording to be highly accurate, the microphones should be as identical as possible. For this reason some microphones are sold as “pairs” after testing and matching each microphone to ensure the frequency response and gain is similar in each microphone. It is worth noting, however, that there are other stereo recording techniques (M/S stereo recording) that may use non-identical microphones, specifically a figure-of-8 mic placed “sideways”, and a cardioid facing forwards.
Valve (or “tube”) versus solid state (or “FET”)
The active electronics used in (predominantly) condenser microphones are required to boost the small signals produced by the diaphragm, so that they can be sent down the microphone cable without getting lost in background electronic noise. These internal amplifiers can make a big difference to the sound, and is one reason why some microphones can be more expensive than others. As with any amplifier, there are various electronic components that can be used to achieve this. Valves, or “vacuum tubes”, can be found in some microphones to add “warmth” to the sound. What we actually mean by warmth can in fact be “distortion”, but it is “nice” distortion. Valves tend to create harmonically-related distortion, which serves to add character to the audio signal, and a good valve mic might well sit in the mix much more naturally due to this distortion, rather than being totally “clean and pure”. Of course, some sources may sound better with a valve mic, and others may not.
Max SPL
As mentioned above, some mic’s can handle louder instruments without distorting, while others would struggle. It’s worth taking this into consideration when choosing which microphone to use for certain applications. In many cases the microphone may have a “pad” switch that can reduce the gain of the microphone, allowing it to be placed next to louder sources, but generally, some mic’s are designed to handle higher Sound Pressure Levels than others.
Microphone Mounting and Isolation
As some mic’s can be really quite sensitive, how they are held in position can be important. Vibrations on the body of the microphone (eg. foot tapping vibrations travelling up the mic stand and into a condenser microphone casing) will, more often than not, lead to those vibrations being recorded. This is not ideal, so many microphones have some kind of “shock mounting” to reduce this – either built in to the mic itself, or by way of an external elasticated cradle that the microphone sits in. When choosing a microphone, bear this in mind, and budget for an additional shock mount if required.
High Pass Filter
A feature available on some mic’s is a switch that adds a High Pass (or “low cut”) Filter. This electronically removes all frequencies below a certain frequency, and is one way to remove unwanted low frequencies at the point of recording.
Power requirements
Dynamic microphones (and some ribbon mic’s) are usually “passive”, that is they do not require any additional power to function. Studio condensers, and many ribbons, on the other hand, do need power to work. This power is most commonly supplied through the microphone cable itself and is known as “phantom power”. If your microphone requires this, make sure the mixer or pre-amp that the mic is plugged into has this capability (and is switched “on”!), otherwise the mic will not work. Tube mic’s almost always have their own power supply – a separate box that powers the microphone, providing the necessary voltages for the valves to run properly.
Mic pre-amps
Although not part of the microphone itself, the next most important aspect of getting a good recorded signal is the microphone pre-amplifier used to increase the signal level to an acceptable volume that can be recorded. A good mic pre-amp will introduce very little (ideally no) noise of its own, and allow the recording level to be set optimally. A bad pre-amp on the other hand, could make an otherwise good sounding mic into a noisy, or distorted recording. Although beyond the scope of this article, it is worth taking this into consideration when buying a microphone – is your pre-amp going to be the weak link in the chain, and should you budget for a better pre-amp (or audio interface) as well?
Conclusions
Hopefully the information in this article will help you make a more informed decision when it comes to selecting a microphone, even though the subject really deserves a whole book, and not just these basic pointers! Getting the best recording possible from a particular instrument is down to many things – microphone choice, technique, positioning, pre-amp, quality of monitoring, and skill! But with a selection of different mic’s, and the willingness to experiment and learn, you can get great results. The most important thing is to listen, judge, and be prepared to try different things. What works for one situation may not work as well for others. There are no “rules”, but there are some tried and tested techniques, and specific microphones, that have recorded much of the best music ever recorded. With a small armoury of various flavour of mic at your disposal, you are in the best position to make great recordings, even on a modest budget, the rest is down to the player, the quality of the instrument being recorded, your mic pre-amp, and the sound of the room that you are recording in.