SOFT ELICENSER ACTIVATION HELP
Posted on Wed 11 July 2012 in entries
![]() Certain software products require what is known as 'soft eLicenser' activation. This means that you do not need a physical USB eLicenser to activate the software, but you will still need to go through a similar activation procedure. Here is our step-by-step guide to activating a product using a soft eLicenser...
Certain software products require what is known as 'soft eLicenser' activation. This means that you do not need a physical USB eLicenser to activate the software, but you will still need to go through a similar activation procedure. Here is our step-by-step guide to activating a product using a soft eLicenser...
Please note that within this article, when referring to the physical USB eLicenser, although there are other types of USB license devices on the market, we are talking about a Steinberg Key (USB Dongle), or variations of the Steinberg Key, such as the Vienna Symphonic Library Key.
HOW DO I KNOW IF MY SOFTWARE REQUIRES A SOFT ELICENSER?
If your product requires a soft eLicenser to work then it should indicate this fact in the product description on the manufacturer’s website, or in the installation instructions in the product's manual. Unlike a USB eLicenser (Steinberg key), it is not particularly important to know whether a product requires a soft eLicenser or not before you buy it, because you do not need any additional equipment to activate a soft eLicense - just a code and a compatible computer with a working internet connection.
If you are unsure whether a piece of software requires an eLicenser to run (USB or soft), feel free to give us a call on 01202 597180 and we will be happy to help. Make sure to read the product description on our website first though as this should provide you with the relevant information.
SOFT ELICENSER vs USB ELICENSER
Although soft eLicensers may initially sound more practical then USB eLicensers because you don't need any additional equipment (i.e. a USB dongle) to use them, they are actually a lot less flexible than USB eLicensers.
A product activated with a soft eLicenser will only work on the computer that the software was registered on. A license stored on a USB key can be transferred between multiple computers, allowing you to use the software on any compatible computer that you wish (providing the software is also installed on there).
In a similar way, USB eLicensers also protect your software from loss due to events such as hard drive failures. With a soft eLicenser, if your hard drive fails, your license is likely to be lost as well.
Of course, a USB eLicenser can be lost or broken, but providing you have registered your USB key and followed all other necessary precautions, then there are procedures to re-claim your licenses - click here for more information.
For these reasons, you will find that more expensive products will usually require a USB eLicenser, whereas cheaper software and demos will usually require a soft eLicenser, although there are exceptions to these rules, and not all software will require license activation in these ways.
For more information on license activation using a USB eLicenser, click here.
HOW TO ACTIVATE SOFTWARE THAT REQUIRES A SOFT ELICENSER
To activate software that requires a soft eLicenser, make sure that you follow these steps:
1. Ensure that the computer you want to run the software on has a working internet connection. Access to the internet is essential because you need to be able to connect and register with the Steinberg license server.
If your computer does not have an internet connection, you can still activate your software, but you will need to activate it to a USB eLicenser, using a computer that does have a working internet connection - click here to find out how to do this.
2. Install your software on the computer that you want to use it on. Installation may vary slightly depending on what software you are using and what operating system you are working on, so please refer to the product's manual or installation instructions to make sure that you follow the correct procedure.
3. Make sure that you have the latest version of the eLicenser Control Center (eLCC) installed. Click here to download.
The eLicenser Control Center is the software that manages your licenses as well as connects with the Steinberg license server to activate your products.
4. Once all necessary software is installed, launch the eLicenser Control Center software.
If you are on a Windows computer, you will find the eLCC software here: Start menu -> Programs -> eLicenser.
If you are on a Mac, you will find the eLCC software in your Applications folder.
[caption id="attachment_4354" align="aligncenter" width="827" caption="eLicenser Application as seen on a Mac"] ]({static}/uploads/2012/07/eLicenser-Application.png)[/caption]
5. When you start the eLicenser Control Center application (and assuming that a USB eLicenser key is not connected to your computer), the following screen should load up:
[caption id="attachment_4427" align="aligncenter" width="852" caption="eLCC First Screen"]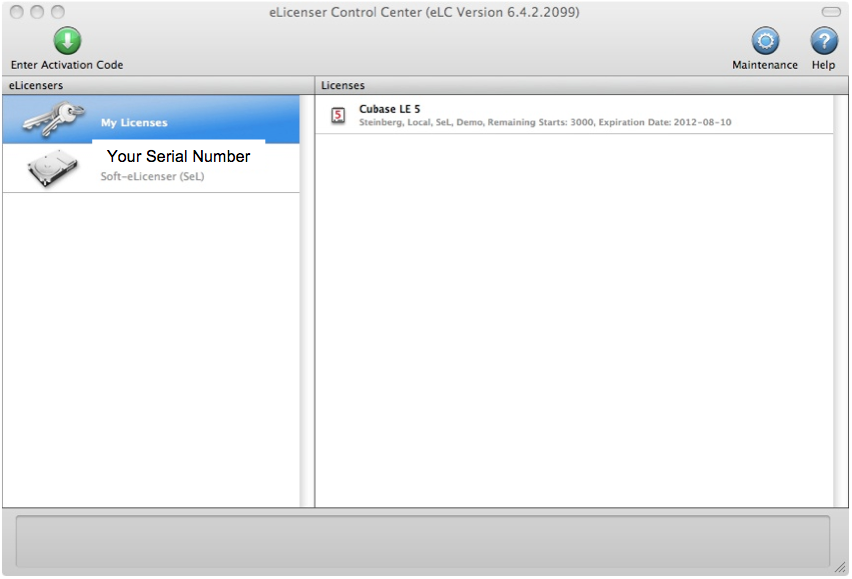 ]({static}/uploads/2012/07/eLCC-First-Screen.png)[/caption]
Please note that in the image above and in all images in this article, the eLicenser serial numbers are blanked out. Instead of the ‘Your Serial Number’ text, you should see the actual serial numbers for your eLicensers! Also in the image above, there is one active license displayed in the right-hand 'Licenses' column. If you are trying to activate a soft eLicense, your license will indicate that it needs to be activated (in the text under the product name in the right-hand column).
If you already have some licenses stored on your computer then these will also show up in the right-hand column. If you have USB eLicenser keys connected, then these will show up in the left-hand column (underneath the keys icon and 'My Licenses' text).
[caption id="attachment_4412" align="aligncenter" width="795" caption="eLicensers"]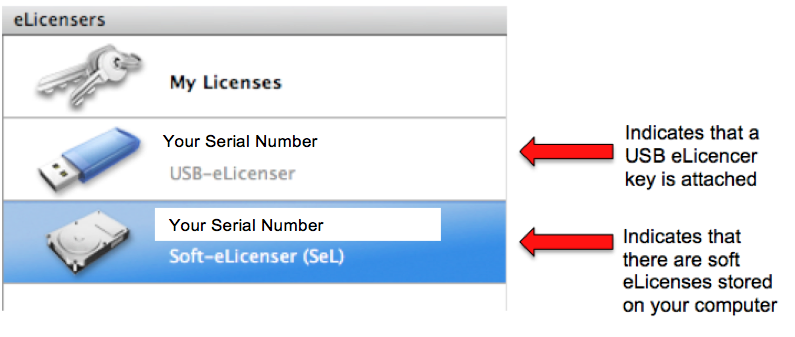 ]({static}/uploads/2012/07/eLicensers.png)[/caption]
If you have multiple eLicensers connected to your computer then they should all appear in the left-hand ‘eLicensers’ column. From here you can use your mouse to select an individual eLicenser and view all the licenses that are stored on it in the ‘Licenses’ column in the right-hand column within the application.
6. If you have followed all the instructions so far, the 'Soft-eLicenser (SeL)' icon and text should be visible in the left-hand 'eLicensers' column (as shown in the images above).
If you cannot see the Soft-eLicenser (SeL) icon, check that the software you are trying to activate is properly installed on your computer and check that it definitely requires a soft eLicense!
Installing the software on your computer should automatically add the Soft-eLicenser (SeL) icon to the left-hand column in the eLicenser Control Center software. If you then click on the Soft-eLicenser (SeL) icon, a list of your soft eLicenses will appear in the right-hand 'Licenses' column. This will include both active and inactive licenses if you have them on your system. However, assuming that you are using the eLicenser Control Center software to activate a soft eLicense for the first time, there will only be one license in the right-hand column:
[caption id="attachment_4428" align="aligncenter" width="849" caption="Soft eLicense in Licenses column"]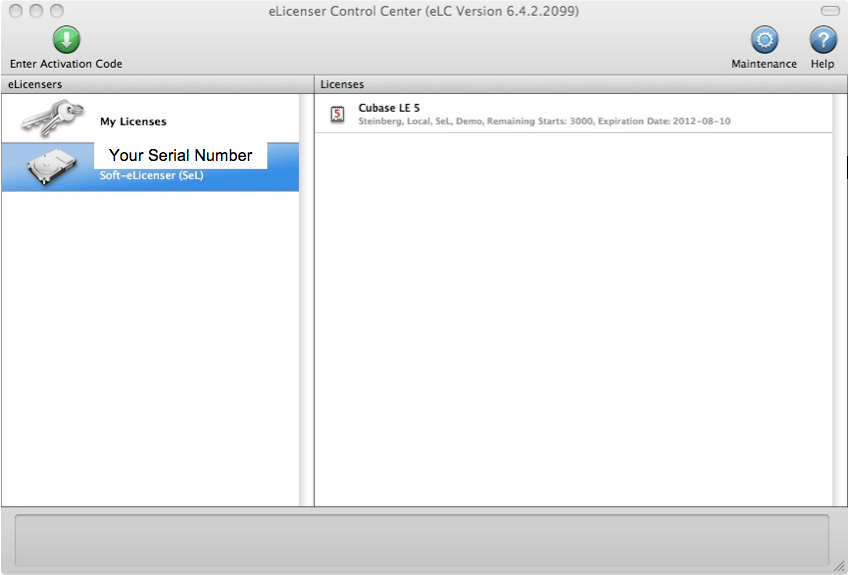 ]({static}/uploads/2012/07/Soft-eLicense-in-Licenses-column.png)[/caption]
7. Click the Soft-eLicenser (SeL) icon if you have not already done so and select the license that you want to activate from the right-hand 'Licenses' column by clicking it.
8. Click the 'Enter Activation Code' button.
[caption id="attachment_4429" align="aligncenter" width="1124" caption="Enter Activation Code Button"] ]({static}/uploads/2012/07/Enter-Activation-Code-Button4.png)[/caption]
9. In the window that appears, enter the activation code (or the first of your activation codes if you have multiple licenses to download). The code should contain 32 symbols, made up of letters and numbers and it should be broken up into 8 chunks of 4 symbols to make it easier to read.
E.g. the activation code should look something like this:
1358 11TU BVCX QWER ASDF HH73 190G 7H0K
You can either manually enter or copy and paste an activation code (if you have received it via e-mail). If you are copying and pasting a code, make sure that you click in the left-most field before you paste it.
[caption id="attachment_4345" align="aligncenter" width="532" caption="Activation Pane"]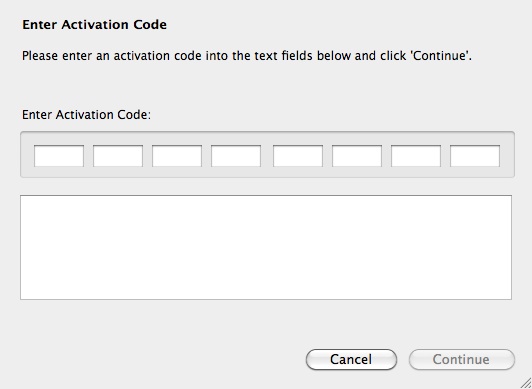 ]({static}/uploads/2012/07/3-Activation-Pane.jpg)[/caption]
10. Once you have entered your activation code, the details of your product/license should show up in the large field below the activation code fields. Check that it is correct and hit 'Continue'.
The ‘Continue’ button will only become available to click once a full code has been entered in the fields – if the ‘Continue’ button is still greyed out, go back and check that you have entered your code correctly.
11. The eLicenser Control Center should then prompt you to select the eLicenser that you want to download your license to. Again, you should be able to see two columns, one with a list of your available eLicensers and the other that lists all the licenses on the selected eLicenser.
If you own a USB eLicenser then you can download the soft eLicense to this if you choose. This will give you added benefits, as described in the 'Soft eLicenser vs USB eLicenser' section near the start of this article.
Assuming that you do not have a USB eLicenser key, select the Soft-eLicenser (SeL) icon and then click 'Download License'.
Remember that an internet connection is required for this process.
[caption id="attachment_4430" align="aligncenter" width="815" caption="Select eLicenser"]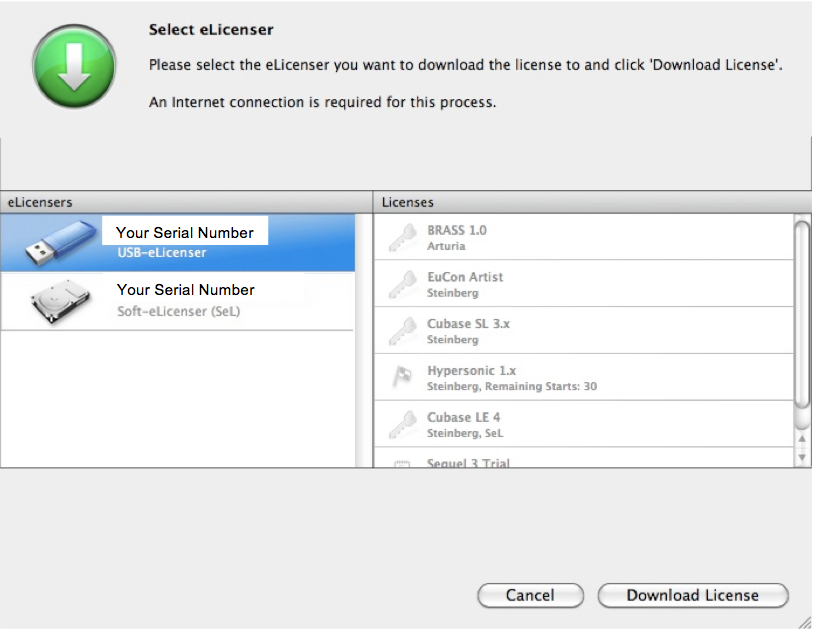 ]({static}/uploads/2012/07/Select-eLicenser3.png)[/caption]
Please note that in the image above, a USB e-Licenser is selected. If you do not have a USB eLicenser key connected to your computer, you will not have this option. To download a license to the soft eLicenser, use your mouse to select the Soft-eLicenser (SeL) icon before you select 'Download License'.
12. The eLicenser Control Center should then inform you that the license is being downloaded. This can take a few minutes so please be patient.
If you had any problems at all getting to this stage, you may also want to check out the 'Help' section in the eLicenser Control Center software (selectable from the eLCC menu bar, or from the top-right of the main eLCC window).
[caption id="attachment_4348" align="aligncenter" width="604" caption="Licence being downloaded"]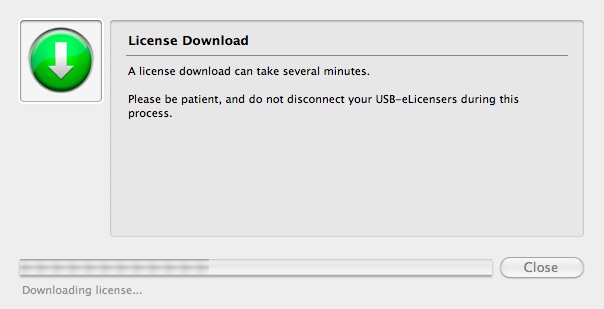 ]({static}/uploads/2012/07/5-Licence-being-downloaded.jpg)[/caption]
13. Once the progress bar has reached the end, the eLicenser Control Center software will inform you that your license has been downloaded successfully. Hit the 'Close' button.
[caption id="attachment_4349" align="aligncenter" width="604" caption="Licence downloaded"]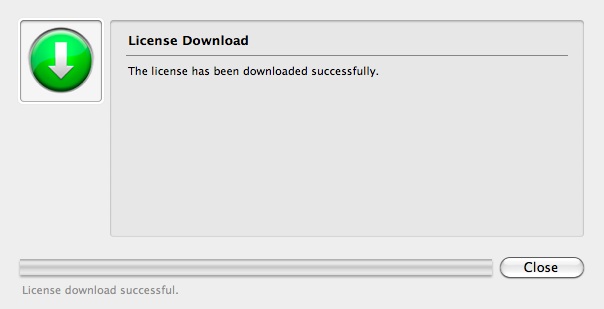 ]({static}/uploads/2012/07/6-Licence-downloaded.jpg)[/caption]
14. IF DOWNLOADING A DEMO LICENSE there will be an additional stage to this process. In this case, once the license has successfully downloaded, the eLicenser Control Center software will ask you whether you want to start the license period immediately. This is useful because trial licenses usually expire after a fixed period of time, and so it allows you to plan the best time to begin using it so that you will get maximum time to try it out. After all, it would be pretty pointless to activate a 2 week demo license the day before you go on holiday for a fortnight!
If you would like to activate the demo license immediately, select the 'Start Usage Period' button. Again, an internet connection is required for this process.
If you do not want to activate the demo license just yet, hit 'Cancel'. When you decide that you want to start making use of the demo license, simply load up the eLicenser Control Center software, select the eLicenser with the demo license on (from the left-hand 'eLicensers' column) with your mouse, select the demo license that you want to activate with your mouse (from the right-hand 'Licenses' column), select 'Actions' from the menu bar and then select 'Start License Usage Period...'
[caption id="attachment_4351" align="aligncenter" width="604" caption="Start Licence Period (for Demo Licenses)"]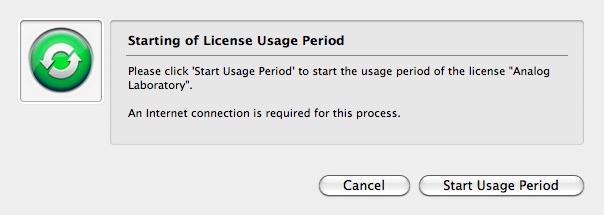 ]({static}/uploads/2012/07/7-Start-Licence-Period.jpg)[/caption]
15. Once your license has downloaded (and been activated if appropriate), the new license should be displayed in the 'Licenses' list (right-hand column) on the main screen of the eLicenser Control Center software, and the software should indicate that it is active, e.g:
[caption id="attachment_4431" align="aligncenter" width="1085" caption="License Active"] ]({static}/uploads/2012/07/License-Active2.png)[/caption]
16. To activate other licenses, simply repeat the steps listed above.
TRANSFERRING SOFT ELICENSES TO A USB ELICENSER
If you own a USB eLicenser, then you can easily transfer soft eLicenses onto it. The benefits of doing this are explained in the 'Soft eLicenser vs USB eLicenser' section near the start of this article.
To transfer a soft eLicense onto a USB eLicenser key, select the Soft-eLicenser (SeL) icon from the left-hand 'eLicensers' column and locate the license that you want to transfer in the right-hand 'Licenses' column.
Then, simply click on the license that you want to transfer with your mouse and without releasing the mouse button, drag your mouse pointer over to the USB eLicenser that you want to transfer the license to (in the left-hand 'eLicensers' column). When your mouse pointer is over the name and icon of the USB eLicenser that you want to transfer the license to, release the mouse button.
[caption id="attachment_4433" align="aligncenter" width="650" caption="Transfer Licenses - Image taken from www.steinberg.net"]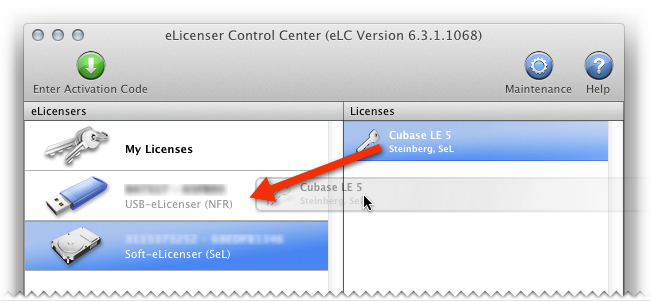 ]({static}/uploads/2012/07/Transfer-Licenses.png)[/caption]
Confirm that you want the transfer to go ahead from the window that pops up and then wait until the transfer is complete.
Simple!
Please note that a USB eLicense cannot be transferred to a soft eLicenser in the same way. Once an eLicense is on a USB eLicenser, it cannot be transferred back to a soft eLicenser.
If you have any further questions about activating licenses using a soft or USB eLicenser, then feel free to leave a comment or give us a call on 01202 597180.
For further information on the Steinberg Key USB eLicenser, click the link below or give us a call!