ROLAND JUPITER-50 REVIEW
Posted on Tue 16 October 2012 in entries
 You can read more reviews like this, listen to Tony’s productions, purchase synth patches and more at his personal site -> Tony Long Music.
ROLAND JUPITER-50 - INTRODUCTION
Yes, I finally have a Roland Jupiter-50 in my mitts and I can't wait to take put it through its paces to find out what all the fuss is about! I already know that it is a very lightweight 76 note keyboard that costs around £1000 less than its bigger (and much heavier) brother, the Jupiter-80, but just how good does it sound and how would it fare on the road? These are just a small number of the burning questions that I have about this keyboard, and that I hope to find out before the end of this review...
ROLAND JUPITER-50 - OUT OF THE BOX
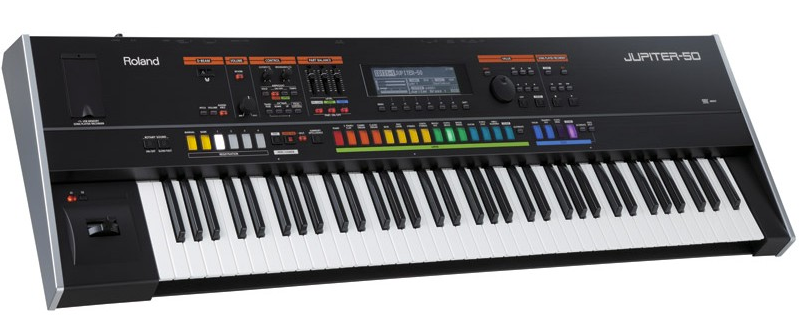
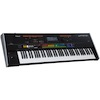
Yes, the Jupiter-50 is very light, weighing an incredible 11 kg (24 lbs. 5 oz.) - how do they do it? The answer is partly to do with the fact that there are no metal ends; these are now plastic and the whole keyboard is much thinner. It sizes up at 1268 mm (49-15/16 inches) wide by 361 mm (14-1/4 inches) deep and just 117 mm (4-10/16 inches) high. Thankfully, despite its lightweight and slim design, it still feel sturdy enough and from a gigging point of view it is excellent - most keyboard players will be able to carry it under one arm!
As I take off the standard wrapper, it reminds me more of a Juno Stage rather than a Jupiter-80! The most obvious and controversial point is that there is no beautiful colour touch screen as there is on the 80. This no doubt contributes to weight loss as it has been replaced by a 240 x 64 pixel display. This is not necessarily going to be a problem though because both the Jupiter-50 and 80 can be edited with ease using their free iPad App.
"That's all ok if you have an iPad" I hear you say. Obviously an iPad will always be preferable because of its exceptionally clear and easy-to-use screen, which allows you to edit the heart of the Jupiter's engine with unrivalled simplicity but if you don't own one, please read on because as I use the smaller screen over the next couple of weeks, I will assess what difficulties (if any) it causes me.
Also included in the box is a CD-ROM (USB Audio/MIDI Driver), a DVD-ROM for Sonar X1 LE, a USB Memory Protector and the AC Adapter and Power Cord.
ROLAND JUPITER-50 - SOUNDS, TONES, LIVE SETS, REGISTRATIONS AND SUPERNATURAL
At first glance it all looks a little bit confusing, so I will try and make this clear so that you don't have to spend the time that I have trying to understand it all. So far I have noticed that everyone who tries playing a Jupiter-50 in the shops starts by playing the first Registration [01] 1-1Chain Saw and thinks 'yeah this sounds great' and then works their way through the registrations before disappointingly discovering that it stops on [01] 4-4 Hit - what?! Only 16 registrations? Where are all the sounds? Most of us are used to keyboards that contain samples that you don't see that much. These samples are then tweaked to form single patches and then you can combine, layer and split them to form combinations. However, Roland's design team have gone for a different approach with the Jupiter keyboards.
The smallest unit of sound in the Jupiter 50 is called a 'Tone'; this consists of a SuperNATURAL sound. Roland state that these are proprietary Roland sounds created using Behavior Modeling Technology, which enables natural and rich expression that was difficult to achieve on earlier sound generators. There are 117 'Preset' SuperNATURAL Acoustic Tones and 1909 'User' SuperNATURAL Synth Tones pre-loaded, plus additional blank Synth Tones giving you a maximum of 2048. Each SuperNATURAL Synth Tone incorporates three Oscillator, Filter, Amp, and LFO sets; this means that powerful synth sounds can be created using just a single tone.
A Live Set consists of up to four of these tones layered together, giving you very expressive sounds. There are 2321 Live Sets pre-loaded, which you can edit/over-write and additional blank live sets giving you a maximum of 2560. Live Sets are assigned to something called the 'Upper Part'.
In addition to the Upper Part, the Jupiter-50 lets you assign SuperNATURAL tones to a Percussion/Lower Part and to a Solo Part, allowing you to use sounds for a total of three parts. The combination of sounds assigned to each part, along with the Jupiter-50's settings, are collectively called a 'Registration.'
By calling up a Registration, you can instantly switch sounds as appropriate for the song you're playing, or switch setups for live performance or studio recording. There is space for 128 Registrations, which should be enough for most live performances. Don't forget that most of the time you will probably be using a Live Set patch.
You can also easily import Live Sets and Synth Tones from the Jupiter-80 into the Jupiter-50 via USB stick. I will try and do this using a download of Jupiter-80 sounds. Something worth reiterating (because it keeps fooling me) is that a Registration has a Live Set in the Upper part but the Lower and Solo Parts do not consists of Tones - not Live Sets. I am not aware that any other keyboard that is set up this way.
ROLAND JUPITER-50 - COLOURS AND CONTROLS
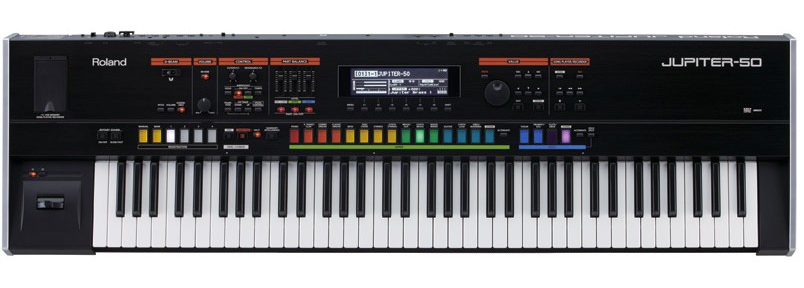
Without counting the keys themselves, the Jupiter-50 is divided in 12 sections; eight on the top row, 3 on the second and the modulation button and scene selector buttons. So let's start with the top row of eight, which has six sections clearly labelled in bright orange.
First off you have the concealed USB socket. Next is the D-Beam with three buttons to control Pitch or Volume or alternatively assign something of your own choice.
The third section is the Volume knob and Reverb button whereby you can easily turn Off or On a Live Set's Reverb effect - very handy.
The forth section is 'Control', which gives you Cutoff and Resonance knobs and buttons for Arpeggiator Hold, Arpeggiator Lower Part, Arpeggiator Upper Part, Tempo, Transpose, Octave Down, Octave Up and a MIDI Visual Control On/Off button.
Section 5 contains the part balance and selector controls. Here you get a slider to adjust the volume of each Part, or the volume of each layer in the Live Set. You then have On and Off buttons for each of the three parts.
The sixth section contains the LCD, which has eight buttons underneath for Menu, Function key buttons F1 to F6 and a Shift button.
After the LCD is Section 7, the Value section, providing you with the usual navigation type buttons for Write, Increase and Decrease values, four-way cursor buttons, Main Value dial, Exit and Enter buttons.
Lastly on this row there is Section 8, which holds the Song Player and Recorder controls. Ok, so there is quite a bit here but it is all very self-explanatory and set out clearly.
The next row introduces the famous coloured buttons, which are an iconic part of all Jupiter keyboards. You will probably notice that there are no under-panel registration buttons as you will find on the Jupiter-80, but four of these can be found on the Jupiter-50's main panel.
The second row starts with the smallest section of the three; the Rotary Sound section, with just two buttons to turn it Off/On or adjust the speed (Slow/Fast). Next up is the Registration Section with six buttons as follows; a Manual Button, which selects a simple Registration in which only the Upper Part will be heard, a Bank Button and four Registration buttons labelled 1 to 4.
The last section is the biggest and allows you to select the tones for the parts. First off are four buttons to select Percussion, Lower Part, Split and Harmony Intelligence. Next is the green section with 15 instrument category buttons to select the Upper Part and an alternate button to call up different sounds that are similar to the Upper Part's sound buttons. You then have the blue section with 4 instrument category buttons to select the Solo Part and again, there is an Alternate button for the Solo Part. The last button is another Split button but this time for the Solo Part. How can anyone say you doní' have much control over this keyboard?
ROLAND JUPITER-50 - THE LCD AND MENUS
As you power up the Jupiter-50 (which by the way is very quick to load - well done Roland), the first screen shows the name of the currently selected Registration, the sound and volume of each Part, and the split status. I thought this screen was very clear and quickly gave me all the information I wanted.
Something that I quickly learned was that spending a little bit of time learning all the shortcuts to flick between screens was well worth it! The Shift key is used extensively here and you can do things like press 'Shift' and 'F1' to take you straight to the Registration Screen or 'Shift' and 'Assignable' to access the D-Beam Assign Setting Screen.
Another useful tip is that if you hold down the Shift button while editing a parameter's value, the value will change in larger steps for you to quickly move through hundreds of sounds.
ROLAND JUPITER-50 - SINGLE PART PLAY
There is one thing I cannot understand here and that is why I cannot display all of the Live Sets in chronological order and with the same font style to the one that I specified when naming the Live Set. I do not know of any other keyboard that does not do this.
There also appears to be a rather odd looking (almost pointless) screen that shows SINGLE PART PLAY. I understand the purpose of Registrations but the words 'Live Set' give you the impression that you will be using these most of the time. I put this question to Roland UK who have passed this on to the developers in Japan with the hope like me, that a future O/S update could address this.
ROLAND JUPITER-50 - WHAT DOES IT SOUND LIKE?
The Jupiter-50 can produce up to six sounds at a time. It really has the best of both worlds with fantastic SuperNatural Synth Tones as well as the truly authentic SuperNatural Acoustic tones, which are just so perfect. It is hard not to like the Jupiter-50!
When I audition presets I'm also constantly asking myself 'is the sound useable?' Whilst the Jupiter-50 has sounds that I would only consider useful for people writing film scores, most of them are truly fantastic and of course I have to take into account that this synth is designed for everyone, and not just customised for my tastes - how cool would that be though! At the end of the day though, if I don't like something I can always edit it.
The Jupiter-50 can create a huge range of different sounds, from vintage analogue-style tones to sounds that are just sooooo 2012! Something that helps this (that was not on the original Jupiter-80) is the addition of three new low-pass filter options all with 12dB/oct and 24dB/oct modes. Overall the Jupiter-50 is a great sounding synth and I am sure it has loads more potential that can be squeezed out of it if you put in the time. It is also interesting to hear the incredible power difference between a Registration and a Live Set.
ROLAND JUPITER-50 - ARPEGGIATOR
Arpeggios can be played in the Percussion/Lower Part. There are 128 factory styles but just 16 memories for user styles and there are four dedicated buttons for Hold, On/Off for Lower and Upper Parts and a Tempo button. They are all easy to use and the screens they display are easy to understand. To change the style and select from the 128 you need to hold the 'Shift' key down and press the Arp Lower or Upper button. You can also create your own original arpeggio style by importing an SMF (Standard MIDI File).
ROLAND JUPITER-50 - IMPORTING LIVE SETS AND SYNTH TONES
So, I have downloaded the Jupiter-80's Analog Synth Collection and this has given me two folders called SOUND and BACKUP. Inside the SOUND folder are two files: - Analog Synth bk.svd and Analog Synth bk.bin. Inside the BACKUP folder there are also two files:- JP80.svd and JP80.bin. I have created a folder called ROLAND on my memory stick and saved the two folders (SOUND and BACKUP) inside the ROLAND folder. This is so that the Jupiter 50-will recognise them.
If I go to the Utility Menu and choose 'Import' and press Enter, it gives me an Import (Select Sources) screen. There are then three choices; Registrations, Live Sets and Tones. There are no Registrations in this set so I selected 'Live Sets' and pressed 'F6'. This now gives me the option to select the desired live set and then choose the F4 Mark button or the F5 Markall button. Finally there is an F6 Import button which takes me to a screen to specify the destination for the imported JP80 Live Set.
The LCD screen was self-explanatory and it all worked very smoothly. I now have some interesting analogue sounds to play with!
ROLAND JUPITER-50 - EDIT AND IPAD
I found that I could edit Tones, Live Sets and Registrations on the LCD but obviously this is much easier on the iPad, which shows everything you need on one page. In the top left-hand corner there is a Read button and as you press this it displays all the settings for the current patch you have loaded on your Jupiter, giving you full control over your synth creation and synth editing.
ROLAND JUPITER-50 - SONG PLAYER AND RECORDER
The USB Memory Song Player/Recorder plays back audio files in WAV, mp3 or AIFF that you've copied from your computer to a USB flash drive. You can also record the Jupiter-50's performance and save it as a WAV file. This is great fun and amongst other things, it allows you to make your own backing files for playing over the top, which may also be beneficial for live performance purposes. What is also great is that the WAV files will play up to 24-bit, 96 Hz.
I tried playing some mp3s that I had and they all played extremely well and the Jupiter-50 gives you options for adjusting the volume, the speed and the pitch as well as for looping particular parts to practice and chain songs - excellent. Again the LCD screen was easy to use here.
ROLAND JUPITER-50 - CONNECTIONS
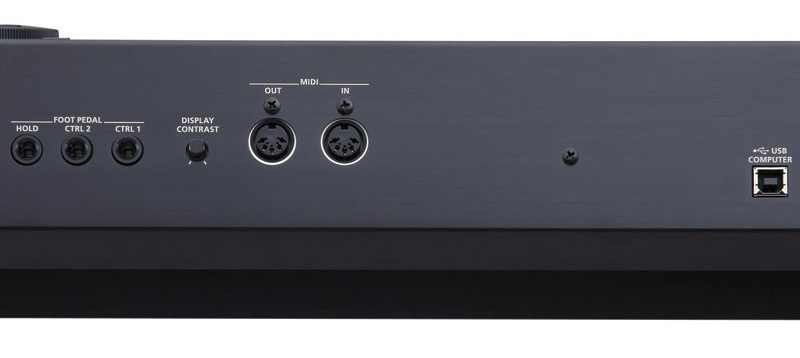
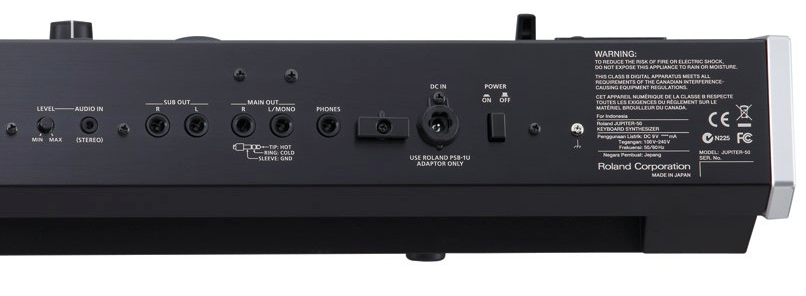
The connections start on the left with three 1/4 inch jack pedal inputs for Hold, Control 1 and Control 2 for expression pedals to control various parameters or functions such as aftertouch. Next is a Display Contrast dial and then MIDI In and Out. In the middle is a USB 1 socket to connect the Jupiter-50 your computer. On the right you have a stereo audio input, which has a level dial. There are then stereo unbalanced quarter-inch sockets for the Sub outputs, stereo quarter-inch TRS jacks for the main audio outputs and an output for stereo headphones and a stereo audio input. That just leaves the power supply input and the On/Off switch.
I really like the flexible use of the Sub outputs for live playing. Here you can connect speakers for use as monitors, or for outputting only the reverb sound. The 'Output Assign' system setting specifies which sounds will be output from the Main Out and the Sub Out jacks. This could be either the Upper Part, Solo Part, Percussion/Lower Part, the Reverb sound, the sound from the USB memory song player and the AUDIO IN jack or the metronome sound.
ROLAND JUPITER-50 - ACCESSORIES
There is a handy bag that you can get for your Jupiter-50. The reference number is CB-76RL. This looks ideal to protect it in transit and storage. It has a large outer pocket and an inner pouch for storing AC adaptors and other small items. Interior cushion pads help protect your 50's controllers, knobs and bender levers.
ROLAND JUPITER-50 - CONCLUSION
Well what a fun and large review this has been. There are a lot of words here but I have still hardly touched the surface of the Jupiter-50! I have really enjoyed my time with this instrument. There is a little bit of a learning curve here but it is worth making the effort.
To summarise my thoughts on the LCD screen, I think for the majority of tasks it works very well and Roland have done a good job here. For sound creation I found that the iPad app really helped speed up my workflow, but it isn't essential to own.
If you intend to use the Jupiter-50 in the studio, then what you will get is a very competent and powerful workstation. If you are a Sonar user, you'll find the Jupiter-50 even more handy as it can act as a controller for this DAW! And if you don't own any recording software, the Jupiter-50 comes bundled with Sonar LE, so you can get recording your performances to your computer straight out of the box if you so desire.
The SuperNatural sounds on the Jupiter-50 are very realistic, smooth and warm but can also be very punchy. It is hard not to love the sound of the Jupiter and I am sure you will agree if you try one.
If you are a live performer and are weighing up whether or not to get the Jupiter-50 or 80, then it really depends on a few things. Looking at the Jupiter-50, with its fantastic sound, excellent weight and price, you have to offset these against the negative issues. However, I feel that the iPad editor gives you the screen you would ideally want it to have. The 128 polyphony is annoying but in most situations of live playing, it should not cause you too much of a problem.
Obviously if you can afford the price of a Jupiter-80 and you really want the colour touch screen, 256 polyphony and aftertouch, before you part with money be sure that you are ok with carrying the extra 6.7 kg of weight. Personally, I prefer the portability and price of the 50.
For more information on the Roland Jupiter-50, click the link below or give us a call on 01202 597180.
Roland Jupiter-50 - More Info/Buy
Roland Jupiter-80 - More Info/Buy
Roland Jupiter iPad Editor App
******If you're interested in buying and you have seen it cheaper elsewhere, please call us or use our
As well as receiving our first rate customer service you can also claim money off your next purchase with our loyalty points scheme and receive a 3 year warranty if you sign up to our FREE VIP Club (click here for more infomation). Many of our items also come out on a FREE next-day delivery service to mainland UK customers, so you won't be left waiting!
Also, if you want to keep up with all our latest offers, competitions, news and videos, why not follow us on Facebook and Twitter?
