OPTIMISING WINDOWS XP FOR MUSIC PRODUCTION
Posted on Thu 16 August 2012 in entries
![]() If you are running a Windows XP system with professional audio software, e.g. a DAW, we recommend that you read this article first to make sure that your computer is fully optimised for working in this way. If you are experiencing problems such as pops, clicks, audio dropouts, distortion, noise, installation fails, etc, then we also recommend that you read this article to make sure that you have everything configured correctly.
If you are running a Windows XP system with professional audio software, e.g. a DAW, we recommend that you read this article first to make sure that your computer is fully optimised for working in this way. If you are experiencing problems such as pops, clicks, audio dropouts, distortion, noise, installation fails, etc, then we also recommend that you read this article to make sure that you have everything configured correctly.
Follow this guide to ensure that your computer is optimised for use with audio software. If you are already experiencing problems, please ensure that your audio device is the only thing connected to your computer as you follow this tutorial. This will help to narrow down possible problems.
Please note that all 'click' instructions in this article refer to clicking the left mouse button unless otherwise stated.
Please note - you should firstly ensure that you have the correct drivers installed for your audio device if your device requires them. The latest drivers are usually available for free from the official manufacturer's website - just make sure to download the correct ones as manufacturers usually offer Windows and Mac drivers.
1. If your audio device allows it, set its sample rate to 44.1 kHz and its buffer size to 512. You may need to refer to your audio device's manual if you do not know how to do this as different devices often come with different software drivers with different ways of changing such settings!
Once you have finished following this guide, you may want to set the sample rate and buffer size to different values again. If your system works fine at some sample rates and buffer sizes, but you experience problems with others, then it is recommended that you return the sample rate and buffer size back to values that do not cause problems.
2. Click 'Start'.
[caption id="attachment_4835" align="aligncenter" width="716" caption="Start Button"] ]({static}/uploads/2012/08/XP-Start-Button.png)[/caption]
3. Click 'Control Panel'.
[caption id="attachment_4836" align="aligncenter" width="511" caption="Control Panel"]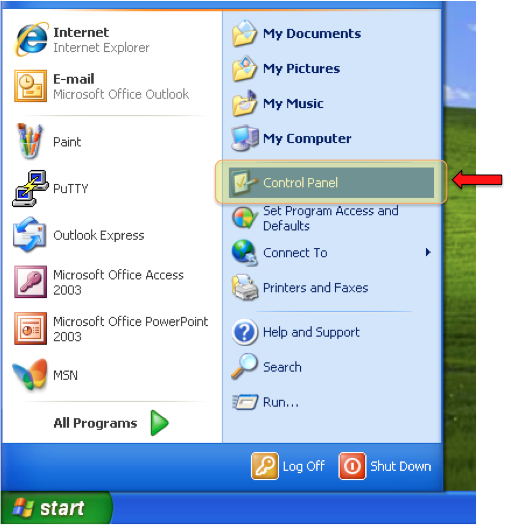 ]({static}/uploads/2012/08/XP-Control-Panel.png)[/caption]
4. Click to switch to 'Classic View' in the Control Panel if it is not already set in this mode.
[caption id="attachment_4876" align="aligncenter" width="785" caption="Switch To Classic View"]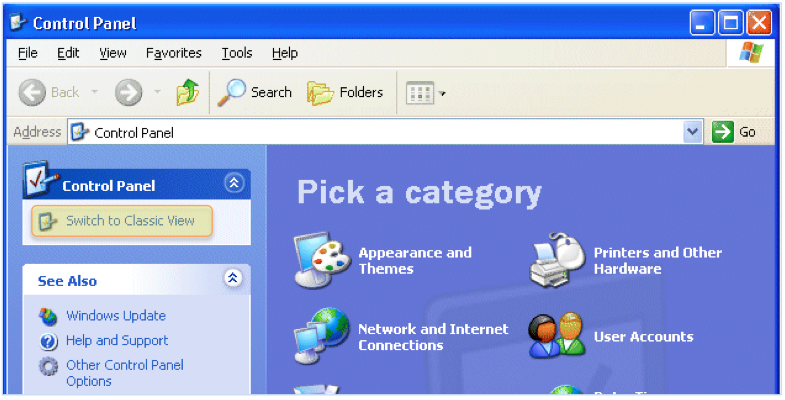 ]({static}/uploads/2012/08/Switch-To-Classic-View1.png)[/caption]
5. Double-click 'Network Connections'.
[caption id="attachment_4877" align="aligncenter" width="778" caption="Network Connections"]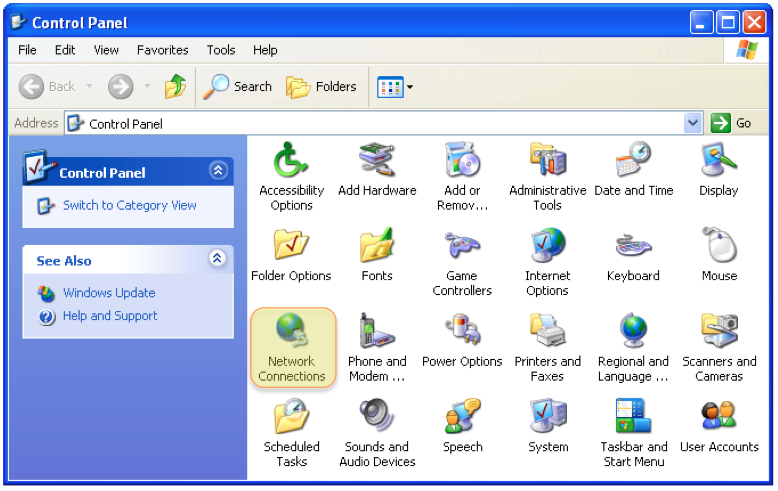 ]({static}/uploads/2012/08/Network-Connections.png)[/caption]
6. If you are using a Firewire audio device, check the 1394 connection to make sure that it is showing up as 'Connected' or 'Enabled'.
[caption id="attachment_4878" align="aligncenter" width="778" caption="1394 Connection - Connected"] ]({static}/uploads/2012/08/1394-Connection-Connected.png)[/caption]
7. If it is not showing up in this state, right-click the non-connected/enabled 1394 Connection and from the menu that pops up, click 'Enable'.
This may help to resolve some installation issues with Firewire devices.
8. If you have a wireless internet connection, it is advisable to disable it when running audio programs. Running a wireless connection uses up lots of your computer's resources, which can hinder the performance of the audio program, causing pops, clicks and dropouts.
In the Network Connections window, locate the Wireless Network connection (if you have one), right-click on it and click 'Disable'.
[caption id="attachment_4879" align="aligncenter" width="592" caption="Disable Wireless Connection"]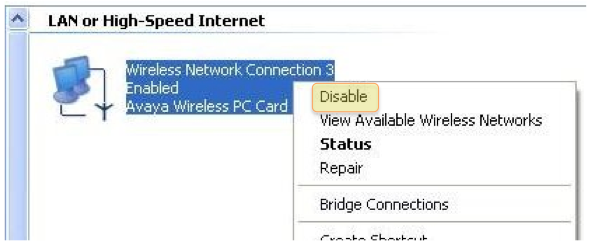 ]({static}/uploads/2012/08/Disable-Wireless-Connection.png)[/caption]
Please note that it is easy to re-enable your wireless connection when you have finished using your audio program - just right-click the Wireless Network Connection and click 'Enable'.
9. Click the 'Back' button to return to the main Control Panel window.
[caption id="attachment_4881" align="aligncenter" width="355" caption="Back Button"]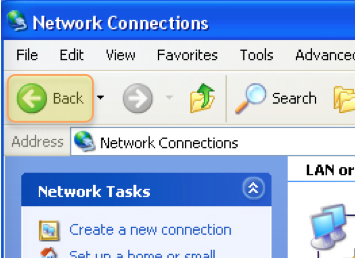 ]({static}/uploads/2012/08/Back-Button.png)[/caption]
10. From the main Control Panel window, double-click 'System'.
[caption id="attachment_4882" align="aligncenter" width="812" caption="System"]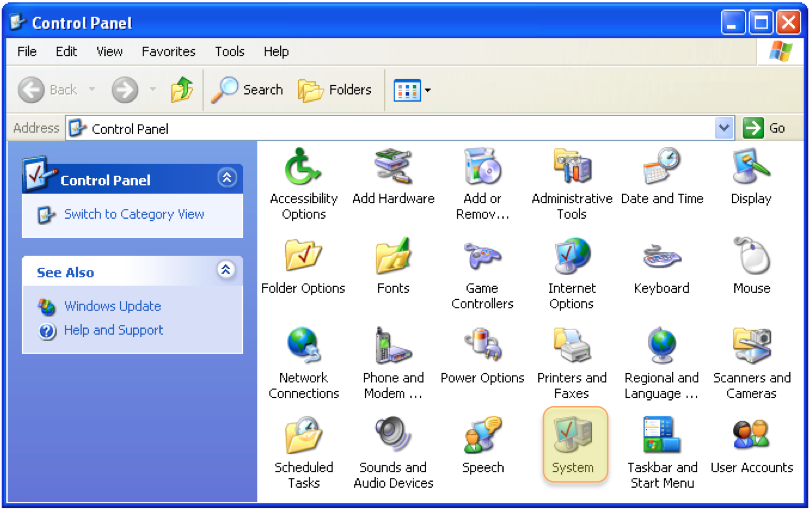 ]({static}/uploads/2012/08/System.png)[/caption]
11. Click on the 'General' tab if it is not already selected and check that the operating system fits in with the minimum specifications of your audio device. Your audio device is also likely to require a Windows Service Pack, so check that your computer has this installed.
From this page, also check that your computer's CPU speed and RAM at least equal the minimum requirements of your audio device.
Please check the audio device manufacturer's website for up-to-date minimum requirements. If you find that your computer does not match or exceed the minimum specs for the device, it's time to upgrade your software/system components/computer, or purchase another (compatible) interface.
Also check that all audio software you are using is compatible with your computer's specs.
[caption id="attachment_4884" align="aligncenter" width="417" caption="System Properties - General"]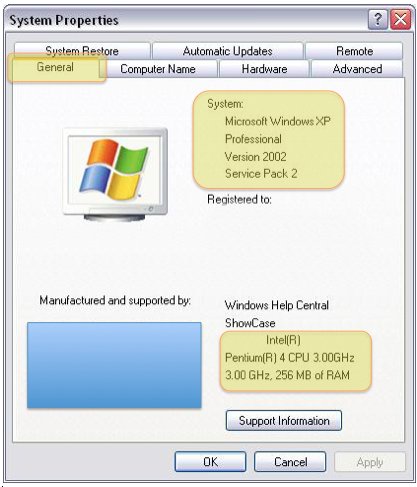 ]({static}/uploads/2012/08/System-Properties-General.png)[/caption]
12. If you have Windows XP 64, please check to see whether your audio device is compatible with this. Some audio interfaces may not have 64-bit drivers, which will cause installation issues under this operating system.
13. If you are using a Firewire device with Service Pack 2 and you are having installation or performance issues, you may need to download and install the Microsoft patch for Service Pack 2 - http://support.microsoft.com/kb/885222.
14. Click on the 'Advanced' tab in the System Properties window.
[caption id="attachment_4885" align="aligncenter" width="421" caption="Advanced Tab"] ]({static}/uploads/2012/08/Advanced-Tab.png)[/caption]
15. Click the 'Settings' button under the 'Performance' section.
[caption id="attachment_4886" align="aligncenter" width="414" caption="Performance Settings"]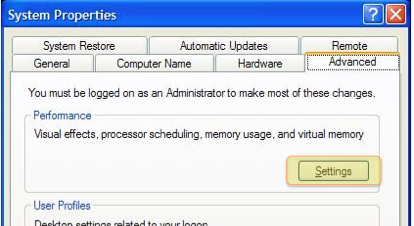 ]({static}/uploads/2012/08/Performance-Settings.png)[/caption]
16. Click on the 'Advanced' tab in the 'Performance Options' window that pops up.
[caption id="attachment_4887" align="aligncenter" width="640" caption="Advanced Performance Options"] ]({static}/uploads/2012/08/Advanced-Performance-Options.png)[/caption]
17. Click in the circular check-field next to the 'Background services' text under the 'Processor Scheduling' section if it is not already checked.
[caption id="attachment_4888" align="aligncenter" width="710" caption="Performance Options - Background Services"]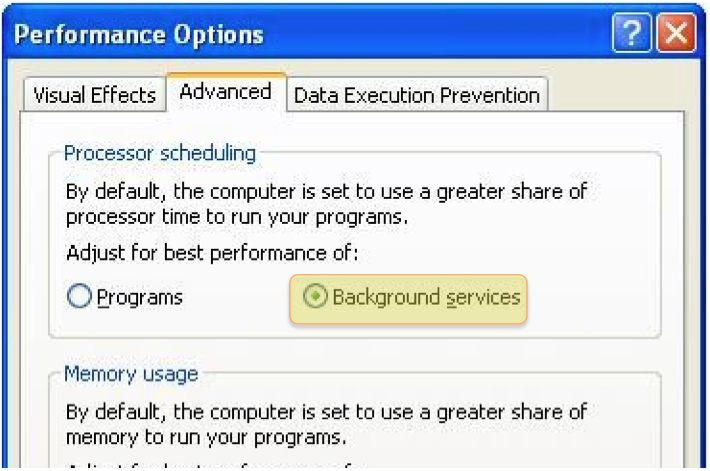 ]({static}/uploads/2012/08/Performance-Options-Background-Services.png)[/caption]
This setting is generally recommended for audio software because it tells the computer to gives things such as drivers more processing priority.
18. Click 'Apply' at the bottom of the Performance Options window.
[caption id="attachment_4889" align="aligncenter" width="641" caption="Apply Button"] ]({static}/uploads/2012/08/Apply-Button.png)[/caption]
19. Click 'OK' to close the Performance Options window if it does not close automatically and then click 'OK' to close the System Properties window.
20. From the Control Panel (follow steps 2-4 to open and configure it), double-click the 'Systems' icon again (step 10).
21. Click the 'Hardware' tab from the System Properties window that pops up.
[caption id="attachment_4890" align="aligncenter" width="723" caption="System Properties - Hardware Tab"] ]({static}/uploads/2012/08/System-Properties-Hardware-Tab.png)[/caption]
22. Click the 'Device Manger' button under the 'Device Manager' section.
[caption id="attachment_4891" align="aligncenter" width="719" caption="Device Manager Button"]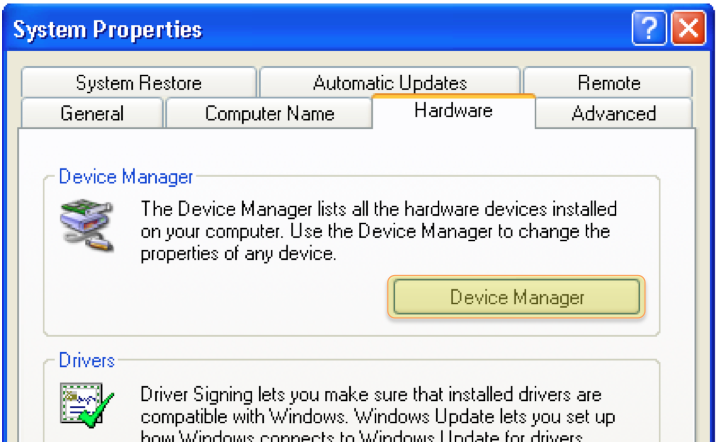 ]({static}/uploads/2012/08/Device-Manager-Button.png)[/caption]
23. The Device Manager window should open. Have a browse down the list and use the '+' symbols to expand categories.
Check for any yellow '!' and '?' or red 'x' symbols next to anything in the list - the main categories to look in are 'Sound, Video and Game controllers', 'IEEE 1394 Bus Host controllers', 'IDE ATA/ATAPI controllers', 'Display Adaptors' and 'Processors'.
[caption id="attachment_4892" align="aligncenter" width="606" caption="Look Out for Symbols Like This!"]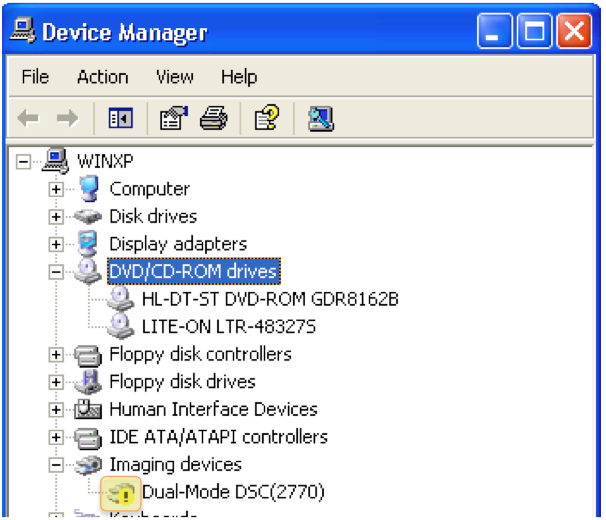 ]({static}/uploads/2012/08/Look-Out-for-Symbols-Like-This.png)[/caption]
A yellow '!' or '?' tells you that a device's drivers have not been installed, or have not been installed correctly. If you find one of these symbols, install or re-install the drivers for that device. Remember to check the manufacturer's website to get the latest drivers! Follow the official manufacturers instructions for installing the drivers.
Once done, check in the Device Manager again to ensure that the offending symbols have disappeared.
A red 'x' means means that the hardware has been disabled. If you need to enable a device, right-click on it in the Device Manager and click 'Properties' from the pop-up menu that appears. The device 'Properties' window should then appear. Click the 'General' tab if it is not already selected and then click the 'Device usage' drop-down menu at the bottom of this window. From this menu, select 'Use this device (enable)' and then click the 'OK' button at the bottom of the properties window.
[caption id="attachment_4895" align="aligncenter" width="401" caption="Device Usage Menu and Options"] ]({static}/uploads/2012/08/Device-Usage-Menu-and-Options.png)[/caption]
You will generally see the name of your audio device under the 'Sound, Video and Game controllers' section. If it is not here, you may need to reinstall the drivers.
The 'IEEE 1394 Bus Host controllers' category is your computer's Firewire connection(s). If you are using a Firewire audio device, check the Firewire card in the list to ensure that it is compatible with your Firewire audio device - again, you will need to check the audio device manufacturer's website to see what Firewire cards it is compatible with. If your Firewire card is not compatible, it is time to upgrade it, upgrade your computer, or think about getting a different interface (i.e. a USB or compatible Firewire interface).
24. The 'IDE ATA/ATAPI controllers' section shows your hard drive controllers and you will typically see 'Primary IDE Channel' and 'Secondary IDE Channel' in here, although you may also see two of each.
With the 'IDE ATA/ATAPI controllers' section expanded, right-click on the first listed IDE Channel and select Properties (or double-click on it).
[caption id="attachment_4897" align="aligncenter" width="683" caption="IDE ATA/ATAPI Controllers Section Expanded"]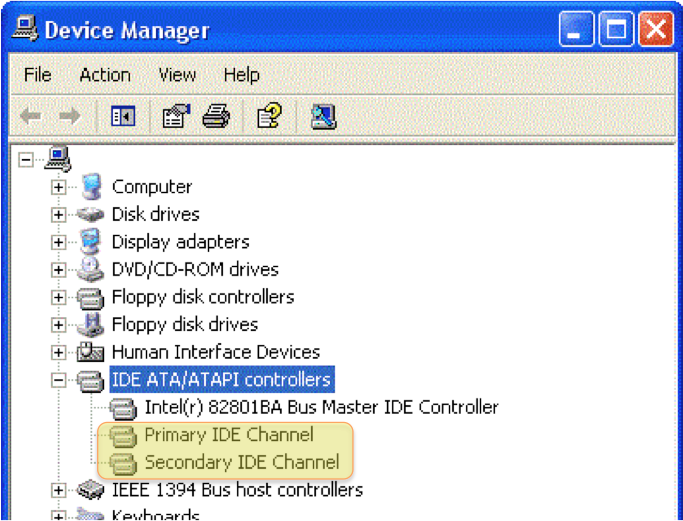 ]({static}/uploads/2012/08/IDE-ATAATAPI-Controllers-Section-Expanded.png)[/caption]
25. From the Properties menu that pops up, click the 'Advanced Settings' tab.
[caption id="attachment_4898" align="aligncenter" width="702" caption="Advanced Settings Tab"] ]({static}/uploads/2012/08/Advanced-Settings-Tab.png)[/caption]
26. Check the 'Current Transfer Mode' for the selected driver.
[caption id="attachment_4899" align="aligncenter" width="590" caption="Current Transfer Mode"] ]({static}/uploads/2012/08/Current-Transfer-Mode.png)[/caption]
Ultra DMA Mode is usually best for CD drives.
Ultra DMA Mode 5 and 6 are usually best for hard drives.
PIO Mode is an older, slower data transfer mode and so it can cause some performance issues. This mode may need to be changed if it is set for any channel. If a channel is set to PIO mode, it can cause clicks, pops and/or distorted audio.
You should be able to alter the 'Current Transfer Mode' by clicking and making an alternative selection in the 'Transfer Mode' field, although the transfer mode may not always be possible to change.
27. Repeat steps 24-26 for all other listed IDE Channels, ensuring that PIO mode is not set for any of them if possible.
28. In the Device Manager window, click the '+' symbol to expand the 'Display adapters' category (if it is not already expanded). Check for 'ATI RADEON 9000' or 'ATI RADEON 9001' as these have a known and irresolvable issue and so if they are present, could be a reason that you are experiencing problems. If you find one of them, it may be time to upgrade your computer.
29. In the Device Manager window, click the '+' symbol to expand the 'Processors' category (if it is not already expanded). Check for 'INTEL 925' or 'INTEL 955 X'. If you find any of these, you may need to download and install the INTEL Storage Manager utility - click here to search for the latest version.
30. Close all windows apart from the Control Panel. If you accidentally close the Control Panel, please refer to sections 2-4 to reopen and format it.
31. Double-click the 'Sounds and Audio Devices' icon in the Control Panel.
[caption id="attachment_4900" align="aligncenter" width="713" caption="Sounds and Audio Devices"]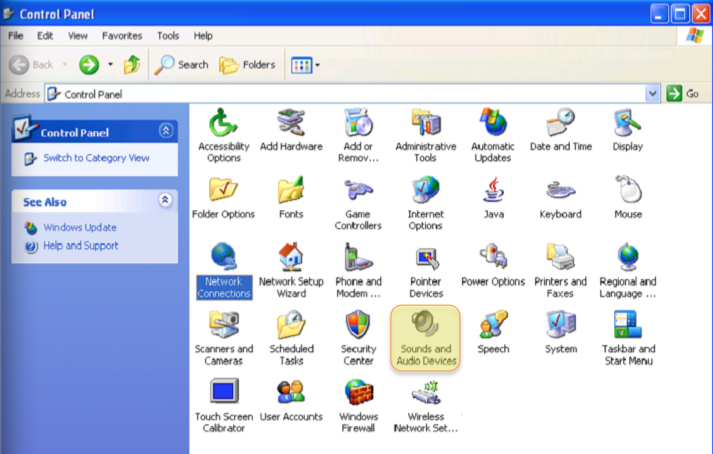 ]({static}/uploads/2012/08/Sounds-and-Audio-Devices.png)[/caption]
32. The 'Sounds and Audio Devices' window should pop up. Click the 'Audio' tab.
[caption id="attachment_4901" align="aligncenter" width="637" caption="Audio Tab"] ]({static}/uploads/2012/08/Audio-Tab.png)[/caption]
33. Set the 'Default device' under the 'Sound playback' section to your recording device's 1/2 output channels. Click the arrow next to the 'Default device' field to make your selection from a drop-down menu.
[caption id="attachment_4902" align="aligncenter" width="635" caption="Select Default Device"]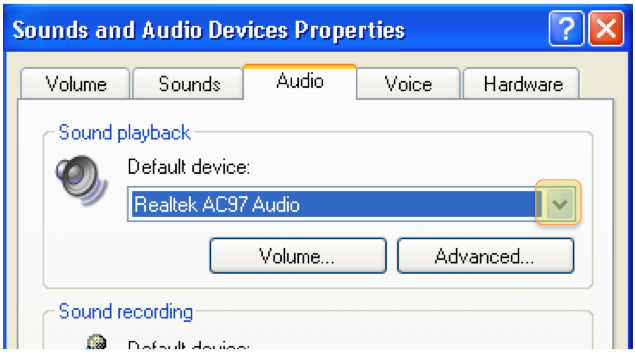 ]({static}/uploads/2012/08/Select-Default-Device.png)[/caption]
If the device's channels are not available and the drivers are all installed correctly, this may indicate a hardware compatibility issue or faulty device. If the audio device is definitely compatible with your computer, please contact the retailer that you bought the audio device from, or contact the device manufacturer.
34. Click 'Apply' in the 'Audio' tab.
35. Open your preferred music-player (e.g. Windows, iTunes, etc.)
36. Play an audio CD or audio file and check that everything is working as it should, e.g. sound is coming out of your preferred speakers and there are no performance issues. If everything works fine, so should other compatible audio programs. If you experience performance issues and have followed the rest of this guide correctly, this suggests that your hardware is either incompatible or faulty, in which case, contact the retailer that you bought the audio device from, or contact the manufacturers of the device.
37. Open your DAW and test software recording and playback. If you experience performance issues and have followed the rest of this guide correctly, this suggests that your hardware or software is either incompatible or faulty, in which case, contact the retailer that you bought the item from, or contact the manufacturer.
SUMMARY
We hope this helped! Please note that this guide was based on a PreSonus article (click here to read it). We've just added some additional information to it, including handy diagrams to hopefully make setting up your Windows XP computer for audio work as quick and painless as possible.
Have fun making music!