HOW TO ACTIVATE CUBASE AI & CUBASE LE
Posted on Tue 17 July 2012 in entries
 ]({static}/uploads/2012/07/Cubase-6.5.png)
So, you've got yourself a copy of Cubase AI or Cubase LE, but you're a bit stuck how to actually get the software up and running?! Follow our simple step-by-step guide and you'll soon be on your way to recording and creating music!
Please note that this tutorial was written for Cubase AI 4, AI 5, AI 6, LE 4, LE 5 and LE 6. Although future versions of the software are likely to require the same methods of activation, please check the official Steinberg website for full up-to-date information: click here.
ACTIVATING CUBASE AI / CUBASE LE
Permanently activating Cubase AI and Cubase LE automatically registers the software with Steinberg, which gives you access to downloads/updates and technical support facilities.
To activate your copy of Cubase AI or Cubase LE, follow these steps:
1. Install your copy of Cubase AI or LE on the computer that you want to use it on. The installation instructions will vary depending on what operating system you are running, so please refer to the official Cubase AI or LE 'Getting Started' documentation. If you do not have the 'Getting Started' guide to hand, you can download it from the official Steinberg website: click here.
2. Ensure that the computer you want to run the software on has a working internet connection. Access to the internet is essential for the activation process because you need to be able to connect and register with the Steinberg license server.
If your computer does not have an internet connection, you can still activate your software, but you will need to activate it with a USB eLicenser/Steinberg Key, using a computer that does have a working internet connection – click here to find out how to do this.
3. Make sure that you have the latest version of the eLicenser Control Center (eLCC) installed. Click here to download it. The eLicenser Control Center is the software that manages your licenses as well as connects with the Steinberg license server to activate your products.
4. Once all necessary software is installed, launch the eLicenser Control Center software.
If you are on a Windows computer, you will find the eLCC software here: Start menu -> Programs -> eLicenser.
If you are on a Mac, you will find the eLCC software in your Applications folder.
[caption id="attachment_4354" align="aligncenter" width="827" caption="eLicenser Application as seen on a Mac"] ]({static}/uploads/2012/07/eLicenser-Application.png)[/caption]
5. When you start the eLicenser Control Center application (and assuming that a USB eLicenser key is not connected to your computer), the following screen should load up:
[caption id="attachment_4427" align="alignleft" width="852" caption="eLCC First Screen"]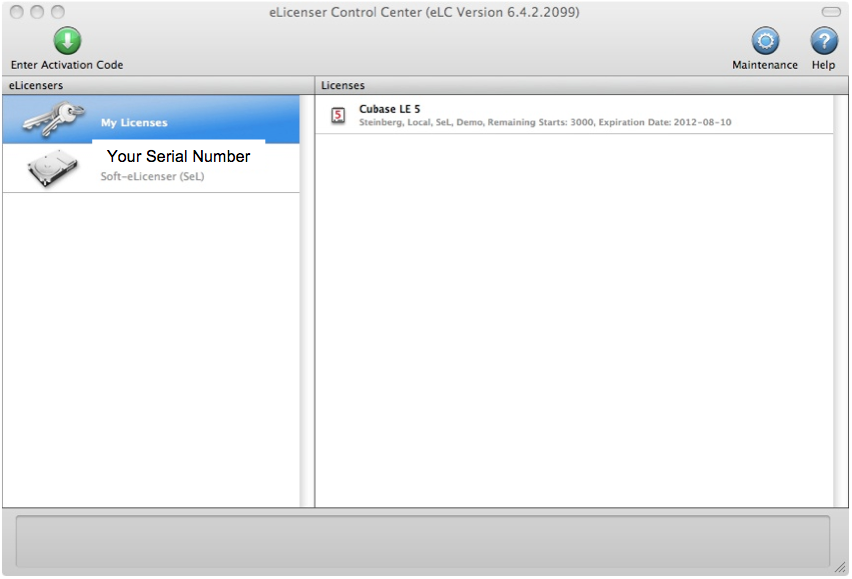 ]({static}/uploads/2012/07/eLCC-First-Screen.png)[/caption]
Please note that in the image above and in all images in this article, the eLicenser serial numbers are blanked out. Instead of the ‘Your Serial Number’ text, you should see the actual serial numbers for your eLicensers! Also in the image above, there is one active license for Cubase LE 5 displayed in the right-hand ‘Licenses’ column. If you are trying to activate your Cubase AI or LE software, your license will indicate that it needs to be activated (in the text under the product name in the right-hand column).
6. Make a note of your Soft-eLicenser number. This is the number displayed in the left-hand 'eLicensers' column, above the 'Soft-eLicenser (SeL) text. In other words, it is the code that is blanked out by the 'Your Serial Number' text in the image above!
7. If you do NOT already have a MySteinberg account you will now need to create one. If you do already have a MySteinberg account, skip to step 24.
8. Go to https://www.steinberg.net/en/mysteinberg.html
9. From the screen that loads up, click 'Create user account' near the bottom of the page:
[caption id="attachment_4503" align="aligncenter" width="825" caption="MySteinberg - Create User Account"]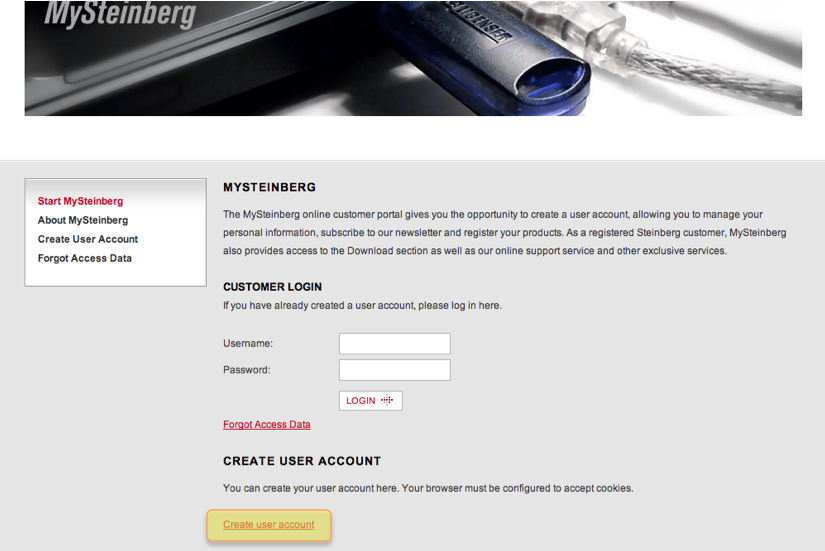 ]({static}/uploads/2012/07/MySteinberg-Create-User-Account1.png)[/caption]
10. Select your country from the 'Country' drop-down menu and then click the 'Step 2: Personal Data button'.
[caption id="attachment_4505" align="aligncenter" width="826" caption="MySteinberg - Select Country"]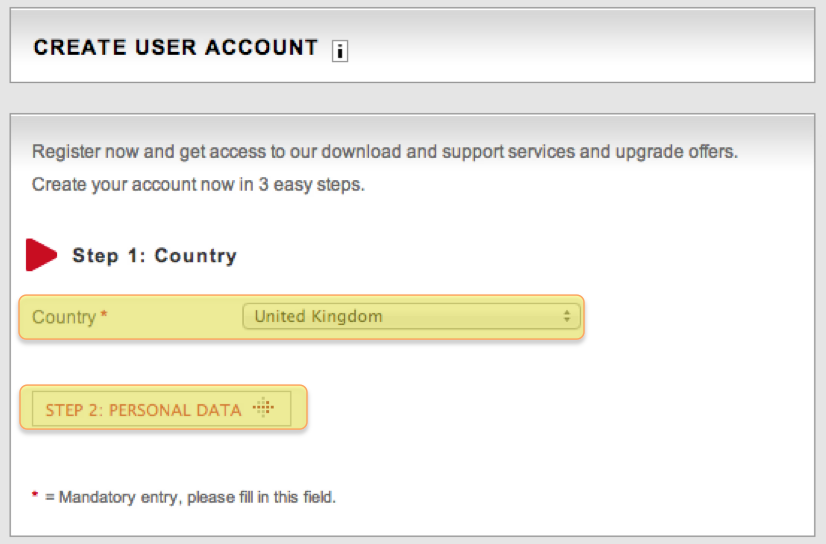 ]({static}/uploads/2012/07/MySteinberg-Select-Country1.png)[/caption]
11. Enter all your relevant details on the 'Personal Data' page.
[caption id="attachment_4506" align="aligncenter" width="557" caption="MySteinberg - Personal Data"]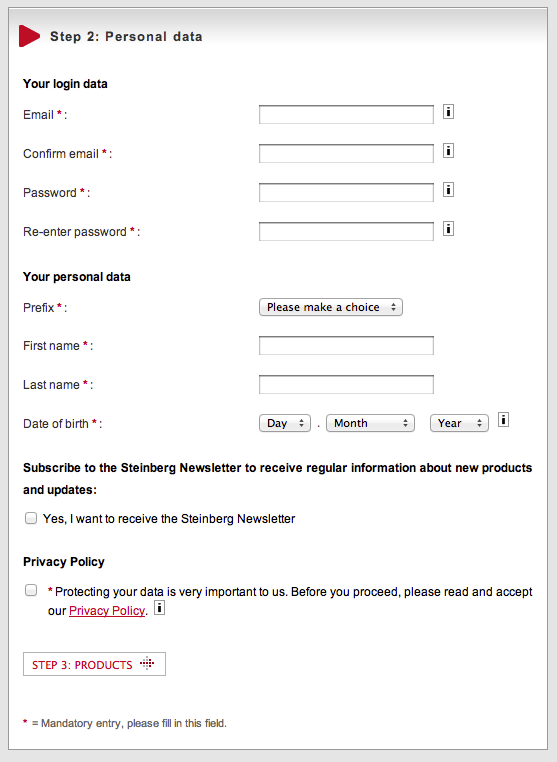 ]({static}/uploads/2012/07/MySteinberg-Personal-Details.png)[/caption]
If you are unsure as to what anything means, hover your mouse over the little 'i' icon next to the relevant field to view some more detailed information:
[caption id="attachment_4508" align="aligncenter" width="1132" caption="MySteinberg - Help Icon"]![]() ]({static}/uploads/2012/07/MySteinberg-Help-Icon1.png)[/caption]
]({static}/uploads/2012/07/MySteinberg-Help-Icon1.png)[/caption]
12. If you want to receive the Steinberg newsletter, click the relevant checkbox
Before you can proceed you must also accept the MySteinberg Privacy Policy, and confirm that you accept its terms by clicking/checking the relevant checkbox. You can view the Privacy Policy by clicking the Privacy Policy text (see below):
[caption id="attachment_4511" align="aligncenter" width="822" caption="MySteinberg - Click to view Privacy Policy"] ]({static}/uploads/2012/07/MySteinberg-Click-to-view-Privacy-Policy.png)[/caption]
13. When all your details are complete, click the 'Step 3: Products' button.
[caption id="attachment_4512" align="aligncenter" width="162" caption="Step 3 Button"] ]({static}/uploads/2012/07/Step-3-Button.png)[/caption]
Please note, if you have missed out any important information or not entered your data correctly, you will be prompted (see image below for an example). Please also note that different prompts may appear on different parts of the screen. You will need to correct all errors before you can proceed to Step 3.
[caption id="attachment_4513" align="aligncenter" width="449" caption="Example Mistake Prompt"] ]({static}/uploads/2012/07/Example-Mistake-Prompt.png)[/caption]
14. Once you have successfully proceeded to the 'Step 3: Products' page, follow the instructions on the screen to complete the account creation process.
The first thing that you need to do is to enter your eLicenser number(s) in the relevant field. If you have multiple eLicensers (e.g. USB eLicensers/Steinberg Keys) that you want to register to your account, enter each on a separate line. For the purpose of this tutorial, you will probably only have one soft eLicenser number though. This is the number that we referred to in step 6.
Please note that you will need to enter your eLicenser number(s) without spaces or hyphens.
E.g. if your soft eLicense appears as: '0123456789 - 01AB2C3456' in the eLCC software, you must type it into the 'eLicenser number(s)' field as '012345678901AB2C3456'.
[caption id="attachment_4516" align="aligncenter" width="633" caption="Enter eLicenser Number in this field"]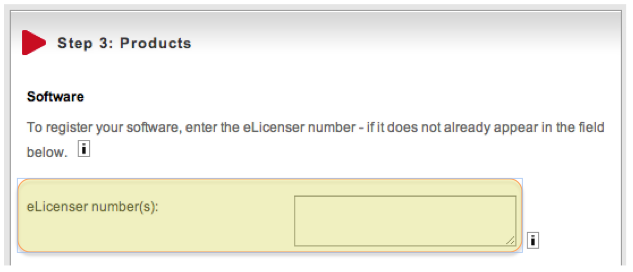 ]({static}/uploads/2012/07/eLicensers-Number.png)[/caption]
15. At this stage you can also register any Steinberg hardware that you have. Just choose your product from the relevant drop-down menu and enter your hardware serial number. This will probably be printed somewhere on the hardware itself. If you are just registering your Cubase AI or LE software, then you can just ignore the Hardware section though. However, if your software came in a bundle with, for example, an audio interface, this is the perfect time to get everything registered in one hit!
[caption id="attachment_4517" align="aligncenter" width="514" caption="Register Hardware - If appropriate"] ]({static}/uploads/2012/07/Register-Hardware.png)[/caption]
16. Check that all your information is correct by viewing the column to the right of the screen (click the 'CHANGE' text at the relevant stage to go back and amend any details).
17. Enter the Security Code that is displayed in the image.
[caption id="attachment_4518" align="aligncenter" width="257" caption="Security Code"] ]({static}/uploads/2012/07/Security-Code.png)[/caption]
18. Hit the 'Create Account' button.
[caption id="attachment_4519" align="aligncenter" width="157" caption="Create Account Button"] ]({static}/uploads/2012/07/Create-Account-Button.png)[/caption]
19. You will be prompted if you entered any information incorrectly (e.g. wrong security code). If so, refill in the relevant field(s) with the correct information and hit the 'Create Account' button again.
This should take you to a screen that confirms that your data has been saved. It should also inform you that a confirmation e-mail has been sent to your e-mail account. You will need to click the link in this e-mail to complete the activation process.
20. Go to your e-mail account and sign in - this should be the account that you entered when creating your Steinberg account.
21. Find the e-mail that Steinberg sent you. If you cannot see it, please wait a few minutes and also don't forget to check your junk/spam filter. In most cases, you should receive this e-mail fairly instantaneously.
22. Within the body of the e-mail text, there should be an instruction that says something along these lines: 'To activate your account please click this link.'
Click the link following this sentence or copy the entire link and paste it into your browser on a separate tab.
23. Following this link should take you to a page on the MySteinberg area of the Steinberg website that informs you that 'Your account has been successfully activated'.
[caption id="attachment_4520" align="aligncenter" width="922" caption="Account successfully activated"]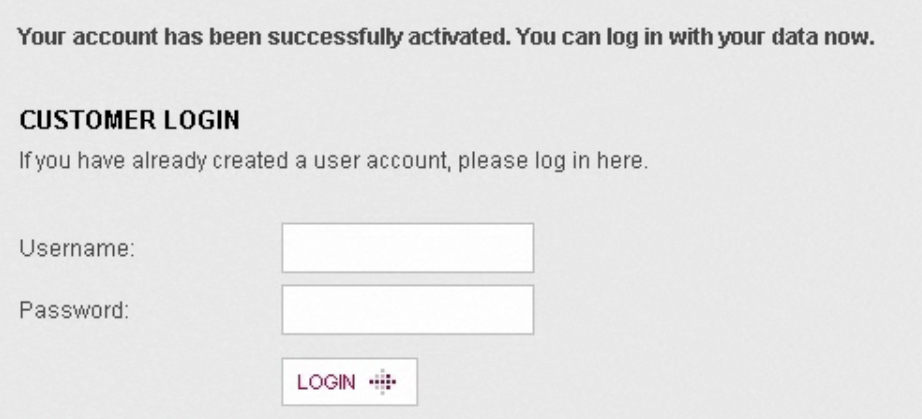 ]({static}/uploads/2012/07/Account-successfully-activated.png)[/caption]
24. Log into your Steinberg account. Your username can be found in the activation e-mail. Your password was the one that you set when activating your account.
Once this information has been entered, hit the 'Login' button.
25. Once you are logged in, make sure that you have the 'Start MySteinberg' tab selected. This should be selected by default when you log in, but if it isn't you can find it in the column down the left-hand side of the screen.
[caption id="attachment_4525" align="aligncenter" width="840" caption="Start MySteinberg tab"]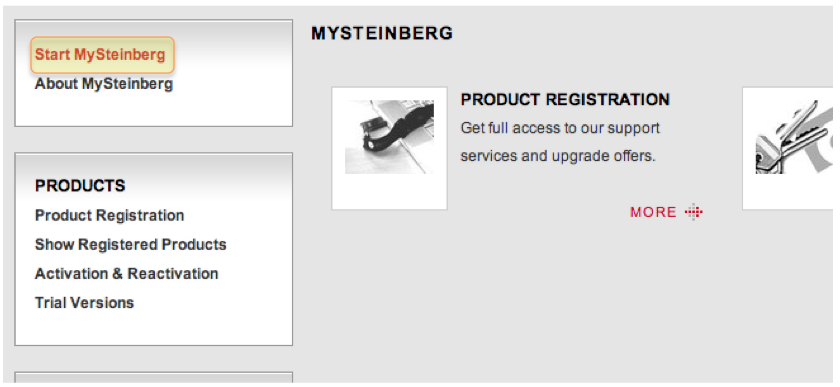 ]({static}/uploads/2012/07/Start-MySteinberg-tab.png)[/caption]
26. On the MySteinberg tab, find the 'Activation & Reactivation' option towards the right of the screen. Click the 'More ->' option underneath it.
[caption id="attachment_4526" align="aligncenter" width="840" caption="Activation and Reactivation"] ]({static}/uploads/2012/07/Activation-and-Reactivation1.png)[/caption]
27. This will take you through to a screen that lists the software that you may want to activate. Locate the software product that you have from this list and click the 'More ->' button beneath it.
For example, if you are trying to activate Cubase LE 6, find Cubase LE 6 in the list and click the 'More ->' button beneath it.
[caption id="attachment_4527" align="aligncenter" width="626" caption="Select software that you have - Example"]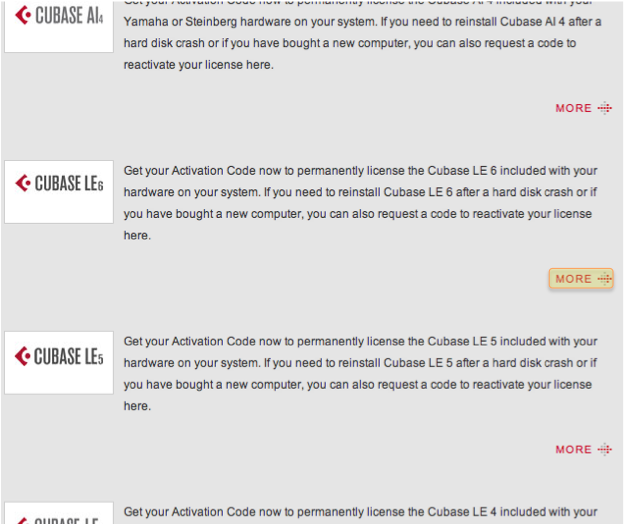 ]({static}/uploads/2012/07/Select-software-that-you-have-Example.png)[/caption]
28. From the next screen, select 'More ->' from underneath the 'Permanent Activation' text.
[caption id="attachment_4528" align="aligncenter" width="631" caption="Permanent Activation"]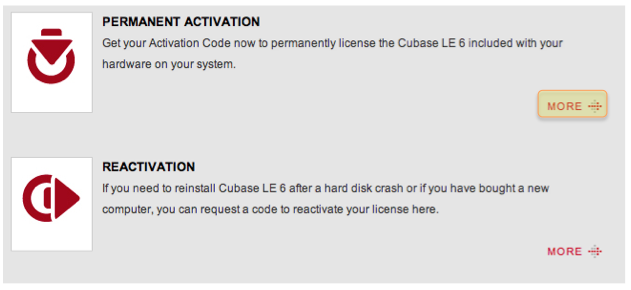 ]({static}/uploads/2012/07/Permanent-Activation.png)[/caption]
29. This should take you onto a screen that says 'REQUEST PERMANENT ACTIVATION CODE FOR \<YOUR PRODUCT>', although obviously it should actually say the name of the product that you selected!
30. Enter your soft eLicenser number in the relevant field. This is the number that we were referring to in step 6.
[caption id="attachment_4529" align="aligncenter" width="630" caption="Enter Soft eLicenser Number"]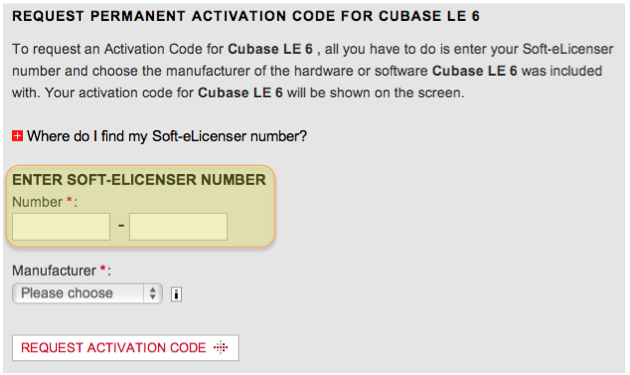 ]({static}/uploads/2012/07/Enter-Soft-eLicenser-Number.png)[/caption]
31. Use the Manufacturer drop-down menu to select the manufacturer of the hardware that your Cubase AI or Cubase LE software came with.
For example, if you purchased the Yamaha Audiogram 6, which comes with Cubase AI, select 'Yamaha' from this drop-down menu.
[caption id="attachment_4530" align="aligncenter" width="630" caption="Choose Manufacturer"]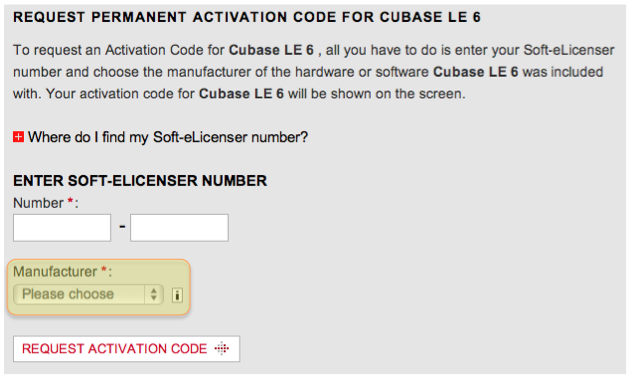 ]({static}/uploads/2012/07/Choose-Manufacturer.png)[/caption]
32. Click the 'Request Activation Code' button.
[caption id="attachment_4531" align="aligncenter" width="239" caption="Request Activation Code Button"] ]({static}/uploads/2012/07/Request-Activation-Code-Button.png)[/caption]
33. This should take you through to a page that states that 'your request was completed successfully' and an activation code should be displayed on the screen.
To view all your activation codes (and so that you don't need to write the code down), select the 'Show Registered Products tab' (in the left-hand column in your MySteinberg account).
Notice that this page also indicates whether the product is activated or not.
[caption id="attachment_4534" align="aligncenter" width="1052" caption="Registered Products"] ]({static}/uploads/2012/07/Registered-Products.png)[/caption]
34. You are now ready to activate your soft eLicense. Essentially this just involves launching the eLicense Control Centre program, clicking the 'Enter Activation Code' button and entering/copying your activation code into the relevant fields.
[caption id="attachment_4429" align="aligncenter" width="1124" caption="Enter Activation Code Button"] ]({static}/uploads/2012/07/Enter-Activation-Code-Button4.png)[/caption]
For a more detailed description of how to activate your soft eLicense using the eLicense Control Centre application, click here to read our step-by-step guide with diagrams.
35. When the license download has been completed, you can now close the eLicense Control Centre and start your version of Cubase AI or LE.
If you go back into your MySteinberg account and select the 'Show Registered Products' option again, you will also be able to view your registered product along with its activation code, plus the date and time that it was registered.
We hope that this guide was helpful! You can also view a video explaining this process on the official Steinberg website - click here.
For more information on Cubase or Cubase-related products, click the links below or give us a call on 01202 597180.